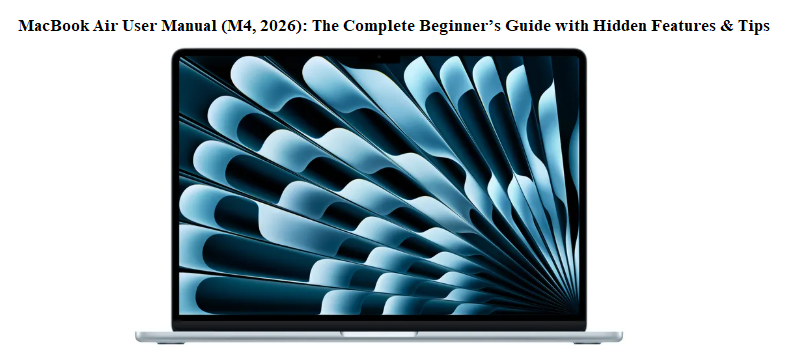
MacBook Air User Manual (M4, 2026) Complete Beginner’s Guide with Hidden Features & Tips
Introduction
Apple’s “manual” for the MacBook Air is a few scraps of paper showing the ports and a link to an online PDF that’s more technical specification than human guide. That’s why “MacBook Air manual” is searched millions of times every year—by students opening their first laptop, by Windows switchers, and even by long-time Mac users who just discovered a hidden gesture.
This MacBook Air manual is written for the M4 model (2026), the sleek 13‑inch and 15‑inch laptops that are thinner, lighter, and faster than ever. It’s the guide you wish Apple shipped in the box. You’ll learn the trackpad gestures that speed up everything, the keyboard shortcuts that replace mouse clicks, the settings that protect your battery, and the macOS secrets most owners never find. Bookmark it — the next time you can’t find a file, your screen goes dim, or you want to connect an external display, the answer is here.
1. What’s in the Box (and What You Need to Buy Separately)
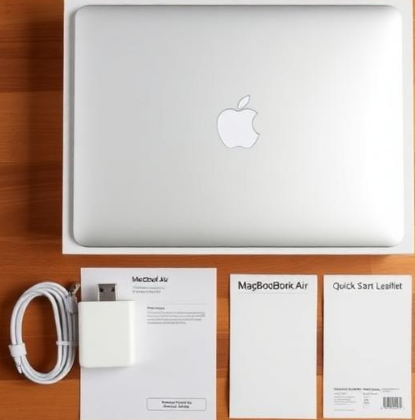
Your MacBook Air box includes:
- MacBook Air (13‑inch or 15‑inch, M4 chip)
- MagSafe 3 charging cable (braided, matching your laptop colour)
- USB‑C power adapter (30W for 13‑inch, 35W dual‑port for 15‑inch — compact and fast)
- Quick Start Guide & Warranty Card — a tiny leaflet pointing you to the official online manual
- Apple stickers
What’s NOT in the box (buy separately):
- USB‑Ch).
- Ethernet adapter: No Ethe
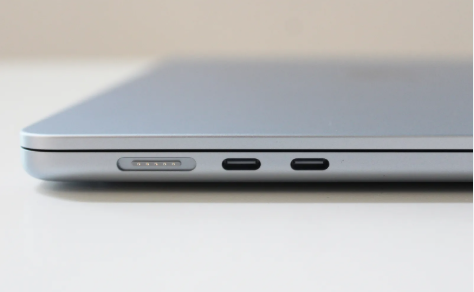
- Hub or dongle: The MacBook Air has only two Thunderbolt 4 (USB‑C) ports and a headphone jack. If you need HDMI, SD card, or USB‑A, you’ll need a hub.
- External display / adapter: No monitor cable included. The laptop supports up to two external 6K displays (one with the lid closed on the 13‑inc
- rnet port; Wi‑Fi 6E and Bluetooth 5.3 are built in.
- Case or sleeve: Apple sells none in the box; protect it yourself.
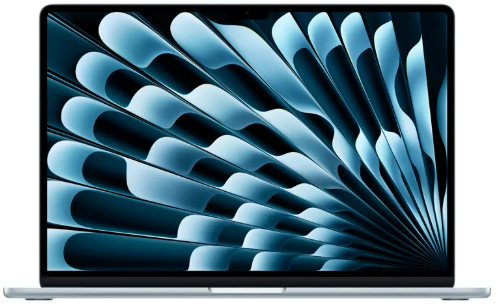
2. Physical Tour: Ports, Keyboard, and the Magical Trackpad
| Port / Element | Function / Tip |
|---|---|
| MagSafe 3 (left) | Magnetic charging connector. Pulls free if tripped over. The LED turns green when fully charged. |
| Two Thunderbolt 4 (USB‑C) ports (left) | Charging, data transfer (40Gb/s), external displays, accessories. Use the same ports for everything. |
| Headphone jack (left) | Supports high‑impedance headphones. Also works as a line‑in for external microphones. |
| Touch ID (top right of keyboard) | Fingerprint sensor for unlocking, Apple Pay, and password autofill. |
| Force Touch Trackpad | No buttons — clicks are simulated by haptics. Supports multi‑touch gestures (covered in Section 4). |
| Keyboard | Backlit. The function keys on the top row (F1–F12) can be used as standard keys or as macOS shortcuts (brightness, Mission Control, media). Toggle between them in System Settings > Keyboard. |
3. First-Time Setup: The Settings You Must Check
When you first turn on your MacBook Air, macOS will guide you through Wi‑Fi, Apple ID sign‑in, and Siri setup. But once you see the desktop, take five minutes to adjust these critical settings.
a) Trackpad Gestures — Enable Them All
- System Settings > Trackpad. Under the “Point & Click” tab, turn on “Tap to click” (no need to press the trackpad hard) and “Secondary click” (two‑finger tap = right click).
- Under the “More Gestures” tab, enable everything: Mission Control (swipe up with three fingers), App Exposé (swipe down with four fingers), Launchpad (pinch with thumb and three fingers), and especially “Swipe between pages” (two‑finger swipe left/right to go back/forward in Safari).
b) Battery Health and Charging
- System Settings > Battery > Battery Health (i) . Make sure “Optimized Battery Charging” is on (it learns your schedule and holds at 80% until you need it).
- For maximum battery lifespan, you can also enable “Manage battery longevity” (new in macOS — limits the maximum charge to around 80% if you rarely use it on battery).
c) Find My Mac
- System Settings > [your name] > iCloud > Find My Mac — turn on “Find My Mac” and “Find My network.” This lets you locate the laptop even if it’s offline (using nearby Apple devices).
d) Hot Corners (Quick Actions by Slamming the Cursor)
- System Settings > Desktop & Dock > Hot Corners (button at the bottom). Set a corner of the screen to trigger Mission Control, Launchpad, Lock Screen, or Quick Note when you push your cursor into it. I recommend top‑right = Lock Screen for instant privacy.
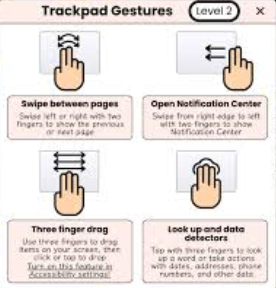
4. Trackpad Gestures and Keyboard Shortcuts That Replace Mouse Clicks
One of the most searched topics for the MacBook Air is “gestures” and “keyboard shortcuts.” Mastering these will change how you use the laptop.
Essential Trackpad Gestures
- Secondary click (right click): Tap with two fingers.
- Scroll: Slide two fingers up/down or left/right.
- Zoom in/out: Pinch two fingers.
- Smart zoom: Double‑tap with two fingers to zoom in on a webpage element.
- Swipe between pages: Swipe left/right with two fingers in Safari or Finder.
- Notification Center: Swipe left from the right edge with two fingers.
- Mission Control (see all windows): Swipe up with three fingers.
- App Exposé (see windows of current app): Swipe down with three fingers.
- Show Desktop (hide all windows): Spread thumb and three fingers apart.
- Launchpad: Pinch thumb and three fingers together.
Essential Keyboard Shortcuts
- Screenshot entire screen: Command + Shift + 3
- Screenshot a selection: Command + Shift + 4
- Screenshot a window: Command + Shift + 4, then press Spacebar, then click the window.
- Copy: Command + C; Paste: Command + V
- Undo: Command + Z; Redo: Command + Shift + Z
- Spotlight Search (find anything): Command + Spacebar
- Force quit a frozen app: Command + Option + Esc
- Lock screen immediately: Control + Command + Q
- Emoji picker: Fn key (globe) or Control + Command + Spacebar
macOS Secrets and Hidden Productivity Features
macOS on the M4 runs beautifully, but many features stay hidden until you dig.
Stage Manager (Organise Your Clutter)
-
Turn it on in Control Center (top‑right menu bar). Your active app stays in the centre, and other apps slide to a neat strip on the left. Great for focusing on a single document while keeping messages visible.
Split View (Two Apps Side by Side)
-
Hover over the green full‑screen button of any window. Choose “Tile Window to Left of Screen” or “Right,” then click the other app you want alongside it.
Quick Note (Instant Jotting)
-
Push the cursor into a Hot Corner set to Quick Note (or press Fn + Q). A sticky note appears without leaving your current app. You can paste links, images, or scribble with your finger if you have an iPad in Sidecar.
Universal Clipboard (Copy on iPhone, Paste on Mac)
-
Make sure Wi‑Fi, Bluetooth, and Handoff are on (System Settings > General > AirDrop & Handoff). Then copy text or an image on your iPhone, and press Command + V on your Mac — it pastes instantly.
AirPlay to Mac
-
Use your MacBook’s screen as a wireless display for your iPhone, iPad, or another Mac. Turn on System Settings > General > AirDrop & Handoff > AirPlay Receiver. Other devices will see your Mac as a target.
Back‑up with Time Machine
-
Plug in an external drive and go to System Settings > General > Time Machine. The Mac will automatically back up every hour. The first backup takes time, but subsequent ones are tiny.
6. Battery & Power Management: Keep Your Air Running All Day
The M4 MacBook Air is famous for all‑day battery life (up to 18 hours). These settings keep it that way.
-
Low Power Mode: In System Settings > Battery, turn on “Low Power Mode” (only on battery) to reduce screen brightness, background tasks, and CPU speed slightly. You’ll barely notice, and it adds hours.
-
Screen brightness: Keep it around 70% or enable “Automatically adjust brightness” (in System Settings > Displays).
-
Bluetooth & Wi‑Fi: Turn them off when not needed (from Control Center or the menu bar).
-
Check battery health: Hold the Option key while clicking the battery icon in the menu bar to see the condition (“Normal,” “Service Recommended”).
-
Fast charging: The included adapter supports fast charging. 30 minutes of charge can give 50% battery.
7. How to Restart, Reset, and Enter Recovery Mode
Simple Restart
-
Click the Apple logo (top‑left) > Restart.
Force Restart (if frozen)
-
Press and hold the Touch ID / Power button until the screen goes black and the Apple logo reappears (about 10–15 seconds). No data is lost.
Factory Reset (Erase All Content and Settings)
-
Apple menu > System Settings > General > Transfer or Reset > Erase All Content and Settings.
This wizard securely erases everything, signs you out of Apple ID, and restores the laptop to new. You don’t need a bootable USB anymore.
Recovery Mode (Reinstall macOS)
-
Shut down the Mac.
-
Press and hold the Touch ID / Power button until you see “Loading startup options.”
-
Click Options > Continue. This opens the Recovery environment where you can reinstall macOS, restore from Time Machine, or use Disk Utility.
8. Troubleshooting Common MacBook Air Problems
| Problem | Fix |
|---|---|
| Trackpad feels sluggish | System Settings > Trackpad > Tracking speed (set to max 7 or 8); enable “Tap to click.” |
| Keyboard keys stop working | Check if Fn key is stuck; toggle Keyboard > “Use F1, F2, etc. as standard function keys.” Restart. |
| MagSafe not charging | Clean the magnetic contacts on the cable and laptop with a dry cloth. The LED should glow orange/green. |
| Screen goes black but laptop is on | Increase brightness using F2 key; or briefly close and open the lid. |
| Bluetooth stuttering | Turn Bluetooth off/on from Control Center. Reset Bluetooth module: hold Shift + Option and click Bluetooth menu bar icon > Reset Bluetooth module. |
| Wi‑Fi slow | Forget the network (System Settings > Wi‑Fi > Details > Forget This Network) and reconnect. |
| App won’t quit | Press Command + Option + Esc, select the app, and Force Quit. |
9. Quick Reference Card: MacBook Air Essential Cheat Sheet
| Action | How |
|---|---|
| Spotlight Search | Command + Spacebar |
| Screenshot (full screen) | Command + Shift + 3 |
| Screenshot (selection) | Command + Shift + 4 |
| Lock screen | Control + Command + Q |
| Force quit app | Command + Option + Esc |
| Emoji picker | Fn key / Control + Command + Spacebar |
| Show Desktop | Spread thumb and three fingers |
| Mission Control | Swipe up three fingers |
| Right click | Two‑finger tap |
| Instant note | Fn + Q (Quick Note) |
| Force restart | Hold Touch ID button 10–15 secs |
| Recovery Mode | Hold Touch ID at startup until “Loading startup options” |
FAQ (For Google’s Featured Snippet)
Q: Where is the official MacBook Air manual?
A: Apple provides a digital manual online under “MacBook Air Essentials” in the Books app, but this guide covers all the practical tips and hidden features the official one skips.
Q: How do I factory reset a MacBook Air M4?
A: Go to Apple menu > System Settings > General > Transfer or Reset > Erase All Content and Settings. The Mac will guide you through securely wiping your data.
Q: How do I right‑click on a MacBook Air trackpad?
A: Tap the trackpad with two fingers simultaneously. You can also enable “Secondary click” in System Settings > Trackpad.
Q: How do I take a screenshot on a MacBook Air?
A: Command + Shift + 3 for full screen, Command + Shift + 4 to select an area, or add Spacebar after the combo to capture a specific window.
Q: Does the MacBook Air M4 support two external displays?
A: The 13‑inch supports up to two 6K displays when the lid is closed. The 15‑inch supports one external display at 6K when the lid is open, two when closed.
Final Word
This MacBook Air manual was built for real‑world use, not for an engineer’s checklist. Whether you’re setting up your first Mac, switching from Windows, or just trying to make the battery last longer, you now have the answers that usually take hours of Googling. Bookmark this page — it will stay up‑to‑date with every macOS update.
Wishing you smooth trackpads, long battery life, and zero accidental screenshots.
© 2026 productsmanual.com All Rights Reserved.
This MacBook Air user manual is original content and may not be reproduced without permission. Apple, MacBook Air, macOS, MagSafe, and Touch ID are trademarks of Apple Inc. This guide is unofficial and not endorsed by Apple.
[…] ASUS ROG Zephyrus G14 laptop (in Eclipse Grey or Moonlight White) […]