

Introduction
The Worx Landroid WR165 is a robotic lawn mower designed to cut grass on its own, navigating within a boundary wire you install around the perimeter of your yard. Worx ships the mower with a charging station, boundary wire, pegs, and a quick‑start card. The printed guide is short, and many new owners search for a “Worx Landroid WR165 manual” because they need help placing the boundary wire, programming the schedule, or understanding error messages like “Lift” or “Outside boundary.” This guide covers every specification, feature, and common fix in plain, practical language.
Full Specifications
| Specification | Detail |
|---|---|
| Model | WR165 (Worx Landroid) |
| Type | Robotic lawn mower with floating cutting disc |
| Cutting Width | 18 cm (7 inches) |
| Cutting Height | Adjustable from 30 mm to 60 mm (1.2 to 2.4 inches), manual dial on the mower |
| Maximum Lawn Area | 1,000 m² (approx. ¼ acre) |
| Navigation | Random bounce pattern with boundary wire; optional ACS (Anti‑Collision System) module sold separately |
| Slope Handling | Up to 35% (20°) |
| Battery | 20V Max lithium‑ion, 4.0 Ah (removable, compatible with Worx 20V power tools) |
| Charge Time | 60–90 minutes for a full charge |
| Run Time | Up to 80 minutes on a full charge |
| Connectivity | Wi‑Fi 2.4 GHz, Bluetooth, Worx Landroid app (iOS and Android) |
| Voice Control | Amazon Alexa, Google Assistant |
| Cutting System | Three‑blade floating cutting disc; blades pivot freely to avoid damage |
| Safety Sensors | Lift sensor (stops blades if mower is lifted), tilt sensor, obstacle bumper sensor, boundary wire sensor |
| Rain Sensor | Built‑in; automatically returns to dock during rain (adjustable sensitivity in app) |
| Dimensions (Mower) | 55.5 cm x 38.5 cm x 24.5 cm (21.9 x 15.2 x 9.6 inches) |
| Weight | 9.7 kg (21.4 lbs) |
| Charging Station | Connects to boundary wire loop; station power adapter input: 100‑240V, output: 20V DC |
| Wire Included | 150 metres (492 feet) of boundary wire |
| Pegs Included | 180 plastic pegs (for securing boundary wire) |
| In‑the‑Box | Mower, charging base, 150 m boundary wire, 180 pegs, wire connectors, 3 replacement blades, Quick‑Start Guide |
Key Features at a Glance
- Boundary Wire Navigation: The mower stays inside a perimeter wire you install around your lawn and around any obstacles. It travels in a random pattern but eventually covers the entire lawn. It also follows the wire back to the dock when it’s low on battery or finished.
- Floating Cutting Disc: The three small blades pivot horizontally on the disc. If they hit a hard object (stone, root), they swing out of the way and then return to the cutting position. This reduces blade damage compared to fixed blades.
- App Scheduling & Control: Use the Worx Landroid app to set a weekly schedule, start/stop the mower remotely, adjust cutting height suggestions, and view the mower’s status. The mower connects via Wi‑Fi 2.4 GHz.
- Rain Sensor: The mower senses moisture and automatically returns to its dock when it rains. It will resume mowing once the rain sensor has dried. Sensitivity is adjustable in the app; you can also postpone mowing for a set number of hours after rain.
- Multi‑Zone Capability: You can set up multiple zones by routing the boundary wire to create separate areas, and then manually carry the mower between zones. A shortcut kit (sold separately) allows the mower to navigate between zones via a wire passage.
- Modular Battery System: The 20V battery is the same as other Worx 20V power tools. You can swap batteries between the mower and a Worx trimmer or blower. If the battery fails, you can replace it without buying a new mower.
What’s Inside the Box
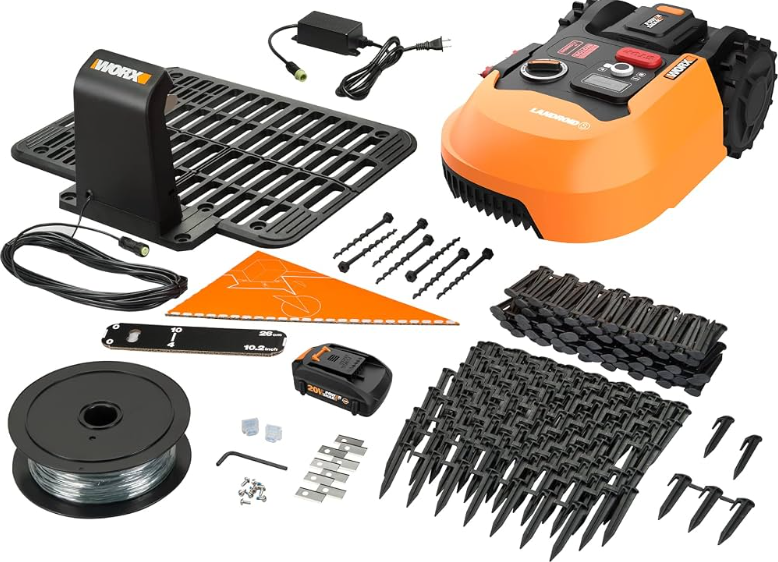
- Worx Landroid WR165 robotic mower (with orange body and three blades installed)
- Charging base (docking station) with power adapter
- 150 metres (492 feet) of black boundary wire (single‑strand, solid core)
- 180 plastic pegs and a peg tool
- 3 spare cutting blades and screws
- Quick‑Start Guide and safety booklet
No hammer is included; use a small mallet or the back of a hammer to drive pegs into the ground. No ACS module is included; it’s an optional add‑on for obstacle detection.
Installing the Boundary Wire and Charging Station
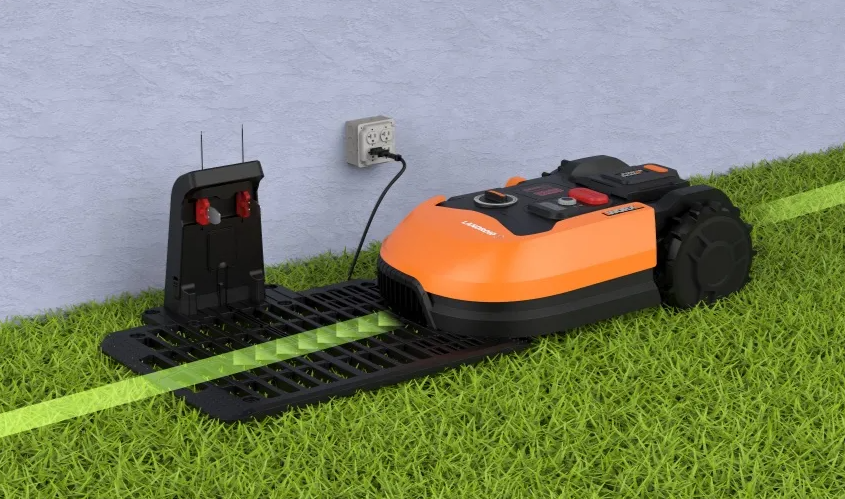
The boundary wire creates an invisible fence that the mower cannot cross. It also guides the mower back to the dock.
- Place the charging station on a level, flat area of lawn, against a wall or fence, in the shade if possible. Leave at least 3 metres (10 feet) of clear space in front of the dock. The dock’s power adapter must be plugged into an outdoor‑rated GFCI outlet.
- Lay the boundary wire from the back of the dock, around the perimeter of your lawn, and back to the front of the dock (to the “Boundary Wire” terminal). The wire must form a continuous loop.
- Keep the wire at the edge of the lawn, about 30‑35 cm (12‑14 inches) from any walls, flower beds, or driveways. If the ground drops off steeply, place the wire at least 1 metre (3 feet) from the edge.
- Peg the wire down every 75‑100 cm (30‑40 inches). The wire should be in contact with the ground and not floating above the grass. After a few weeks, the grass will grow over the wire and hide it.
- Islands (obstacles): To protect trees, flower beds, or ponds that the mower cannot touch, loop the boundary wire around the obstacle and return the wire alongside itself, so the mower sees the obstacle as inside the loop. Keep the two wires close together and peg them side by side — the mower will not detect a false boundary.
- Splicing wire: If you need more wire or accidentally cut it, use the included waterproof wire connectors. Strip the ends, insert both wires into the connector, and press down the locking tab with pliers. The wire must remain a continuous electrical circuit.
- Connect the wire ends to the charging station terminals (the left terminal is “Boundary Wire,” the right terminal is “Boundary Wire” as well — polarity does not matter for the loop). The station’s LED should turn solid green, indicating a complete loop.
First‑Time Setup: Wi‑Fi, App, and Test Run
- Insert the battery into the mower (lift the top cover, slide the battery in until it clicks). Place the mower on the dock so the charging contacts touch. The dock’s LED should pulse green (charging).
- Download the Worx Landroid app (iOS or Android). Create an account.
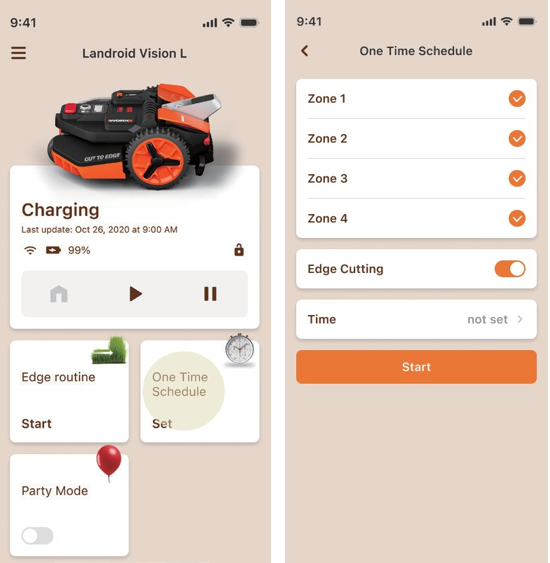
- In the app, tap “Add a Mower” and select the WR165. The app will ask you to connect to the mower’s Wi‑Fi hotspot (the mower broadcasts its own Wi‑Fi during setup). Connect your phone to the mower’s hotspot, then return to the app. Select your home Wi‑Fi (2.4 GHz only) and enter the password. The mower will connect to your network and bind to your account.
- Once connected, set the date and time (important for scheduling). Then, in the app, you can set the mowing schedule, cutting height recommendations, and adjust the rain sensor sensitivity.
- First mow: Press the Start button on the mower (the large button on top), or tap “Start” in the app. The mower will begin mowing. Observe it for the first 15‑20 minutes to ensure it doesn’t cross the boundary wire or get stuck. If it approaches the wire too aggressively, adjust the wire position slightly.
Setting the Cutting Height
The cutting height is adjusted manually on the mower, not in the app.
- Lift the orange top cover. On the top of the mower body, you’ll see a rotary dial with numbers (1‑6 or 30‑60 mm).
- Turn the dial to the desired setting. Lower numbers mean shorter grass. For the first cut of the season, set it higher to avoid scalping. Gradually lower it over subsequent mowings.
- The recommended range is 40‑50 mm for most lawns. Cutting too short stresses the grass and can lead to brown patches.
Scheduling and Seasonal Use
- In the app: Go to Schedule. Tap the days you want the mower to run, and set start times. The mower will automatically leave its dock at those times, mow for the set duration, then return to recharge.
- Edge‑cutting mode: The mower will follow the boundary wire once per run to trim the edges. You can enable or disable this in the app under Settings > Edge Mowing.
- Winter storage: At the end of the mowing season (late autumn), bring the mower and dock indoors. Clean the mower, charge the battery to about 50%, and store in a cool, dry place. Disconnect the boundary wire from the dock or leave it installed; the wire can stay in the ground year‑round.
Troubleshooting Common Issues
| Problem | Likely Cause | What to Try |
|---|---|---|
| Mower shows “Lift” error but it’s not lifted | Sensor dirty or stuck | Lift the mower, clean the underside (especially the small lift sensor near the rear wheel), and restart. |
| Mower says “Outside boundary” but is inside | Wire break or poor connection | Check the charging station LED. If it’s off or red, there’s a break in the wire. Use a wire break detector (sold separately), or check splices. Also test the terminal connections. |
| Charging station LED is blinking red | No loop detected / wire break | The most common cause is a cut boundary wire. Inspect the entire perimeter for cuts. If you recently aerated or dug, start there. Use waterproof connectors to repair. |
| Mower won’t connect to Wi‑Fi | 2.4 GHz not available, or distance | Ensure your router broadcasts a 2.4 GHz network. If the dock is far from the router, consider a Wi‑Fi extender near the yard. Re‑run the Wi‑Fi setup in the app. |
| Battery drains quickly | Blades dull or grass too tall | Replace the blades if they’re worn (you should replace them every 1‑2 months). Cut the grass more frequently so the mower isn’t working as hard. |
| Mower falls outside the boundary at a slope | Slope too steep, or wire too close to edge | The mower can handle up to 35%. If it slides out, place the boundary wire at least 45 cm (18 inches) from a steep drop‑off. |
| Mower not mowing on schedule | Date/time incorrect, or rain delay active | Ensure the mower’s clock is synced in the app. Check the rain delay settings; the mower may be waiting for the grass to dry. |
How to Restart and Factory Reset
Restart: Press and hold the Start button and the Home button simultaneously for about 5 seconds until the display turns off. Then press Start again to turn it on.
Factory reset (clear Wi‑Fi and app pairing):
-
Open the top cover and remove the battery.
-
Wait 10 seconds, then reinsert the battery.
-
The mower will restart. To clear Wi‑Fi, go to the app and remove the mower from your account. On the mower itself, there is no separate factory reset button; removing the battery and re‑adding it in the app is the full reset.
Quick Reference Card
| Task | How |
|---|---|
| Start mowing | Press Start button on mower or tap Start in app |
| Send home | Press Home button on mower |
| Change cutting height | Lift orange cover, turn the rotary dial |
| Check boundary loop | Look at the charging station LED; solid green = good |
| Clean the mower | Remove battery, use a soft brush and damp cloth; never hose down |
| Replace blades | Unscrew the three blades with a Phillips screwdriver, install new blades |
Official Worx Support and Manuals
For warranty, spare parts, and the official PDF manual, visit: https://www.worx.com/support
Frequently Asked Questions
- Can I leave the mower outside in the rain?
Yes, the mower is rain‑resistant and designed to be outdoors. It will automatically return to the dock when it rains. The dock and power adapter are weather‑resistant but should be in a sheltered spot. - Do I need a special outlet for the dock?
The dock’s power adapter plugs into a standard outdoor GFCI outlet (or an indoor outlet with the cable run through a window). Use an extension cord rated for outdoor use if needed, but keep the connection dry. - Can the mower handle my entire lawn without help?
For lawns up to 1,000 m², yes. For larger lawns, you can use a shortcut kit or manually start the mower in different zones. The mower itself is rated for 1,000 m². - What if the boundary wire breaks?
The charging station LED will turn red (or off). You can use a wire break detector to locate the break, or check recent digging/aeration areas first. Use the included waterproof connectors to splice the wire back together. - How often do I need to replace the blades?
About every 1‑2 months, depending on lawn size and debris. The blades are small and inexpensive. Dull blades tear the grass instead of cutting it cleanly, making the lawn look frayed. - Can the mower be stolen?
The mower has a PIN code lock (set in the app). If someone lifts the mower, the alarm sounds and the mower stops. You can also activate the “Find My Mower” feature (tracks location via the app). The mower cannot be used without the PIN. - Why does my mower sometimes leave grass clippings on the surface?
The WR165 mulches the grass into fine clippings that fall back into the soil as fertiliser. You shouldn’t see large clumps unless the grass is very tall or wet. Mow more frequently, and raise the cutting height slightly. - Can I use the mower on a lawn with a steep hill?
The mower handles slopes up to 35% (20°). For steeper areas, place the boundary wire at the top of the slope, not at the bottom, so the mower stays within its climbing ability. - Is the battery interchangeable with other Worx tools?
Yes, the 20V Max battery is compatible with Worx 20V power tools (drills, trimmers, blowers). You can swap batteries if you own other Worx tools. - How do I clean the mower properly?
Turn off the mower and remove the battery. Use a soft brush and a damp cloth to wipe the body and underside. Never use a hose or pressure washer; water can enter the electronics. Clean the charging contacts with a dry cloth. - Does the mower work in the winter?
No, the mower is for grass cutting during the growing season (spring to autumn). Store it indoors during winter with the battery at about 50% charge. - Can I add an anti‑collision system later?
Yes, the ACS module (sold separately) clips onto the mower and uses ultrasonic sensors to detect obstacles. It’s useful for lawns with many trees or garden furniture.
Other Manuals You May Like
If this guide was helpful, here are a few more popular manuals from productsmanuals.com that you might find useful:
- iPhone 17 – Settings, Camera & Hidden Features Manual
Master Dynamic Island, Action button, and battery‑health tricks. - Samsung Galaxy S24 Ultra – S Pen, Galaxy AI & Pro Camera Guide
Get the most from the 200 MP sensor, Circle to Search, and DeX mode. - Kobo Libra Colour – Colour E‑Reader Setup, Library Borrowing & Stylus Tips
Read, annotate, and listen in vibrant colour with your new Kobo. - Haier Super T3 AC – Remote, Self‑Clean & Error Codes Guide
Cool efficiently and fix blinking lights with simple steps. - TP‑Link Deco XE75 – Mesh Wi‑Fi Setup, Parental Controls & 6 GHz Band
Blanket your home in fast, stable Wi‑Fi with easy placement tips.
Browse all guides at productsmanuals.com .
Copyright Warning!
Copyright 2026 productsmanuals.com All rights reserved. This Worx Landroid WR165 manual is original content and may not be copied, republished, or redistributed without written permission. Worx, Landroid, and the Worx logo are trademarks of Positec Tool Corporation. This guide is unofficial and not affiliated with Worx.
