
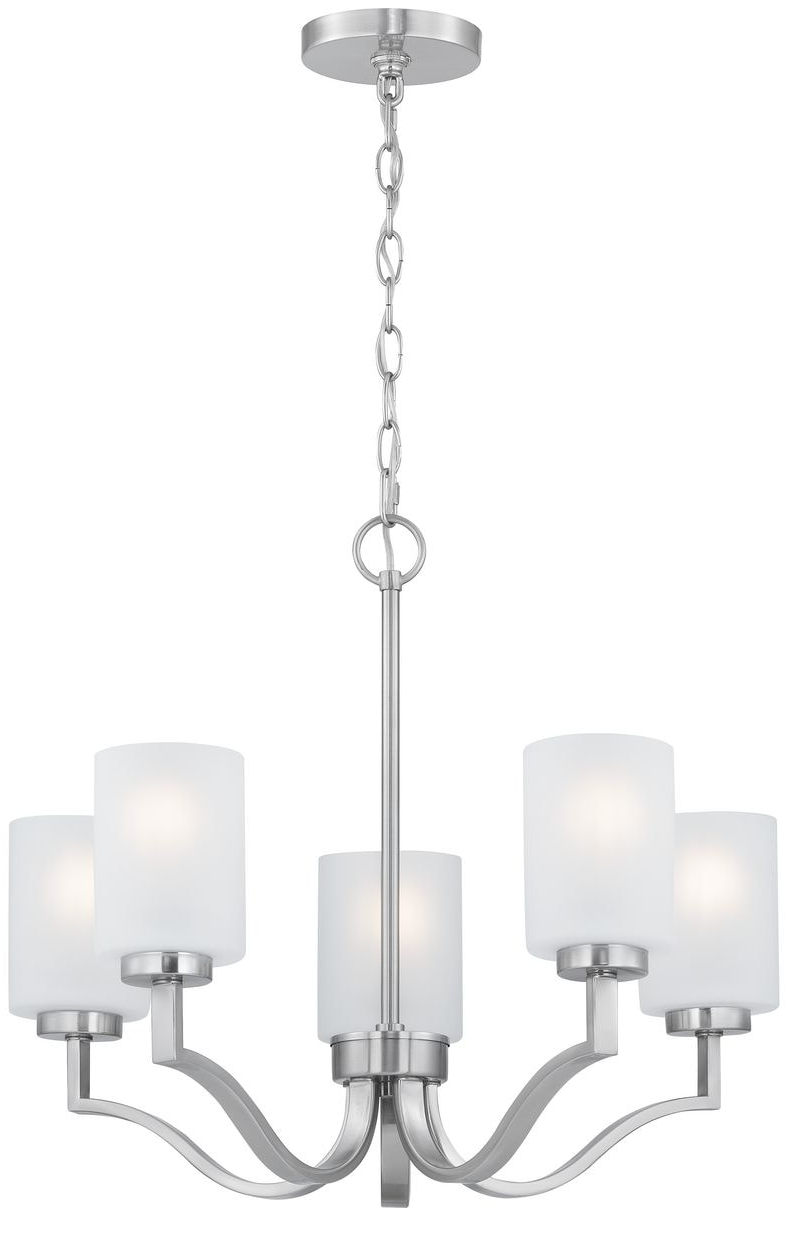
Progress Lighting P400327 5-Light Chandelier
Welcome to the complete owner’s manual for the Progress Lighting P400327 5-Light Chandelier. Whether you’ve lost your original paper instructions or are installing this elegant fixture for the first time, this guide provides all the information you need. You’ll learn how to safely assemble, install, wire, and maintain your P400327 chandelier. Let’s get started.
PACKAGE CONTENTS
PART / DESCRIPTION / QUANTITY
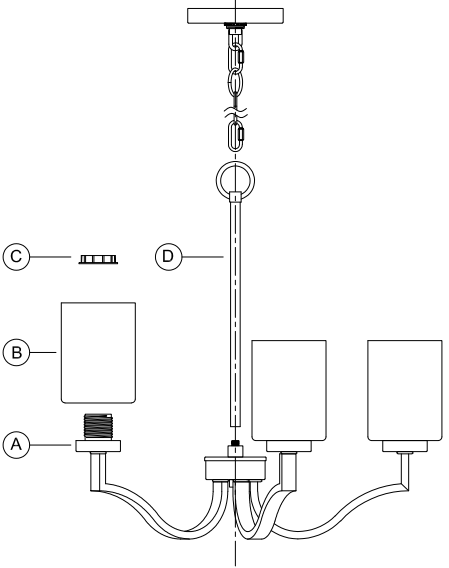
- A: Fixture / 1
- B: Glass Shade / 5
- C: Socket Ring / 5
- D: Stem / 1
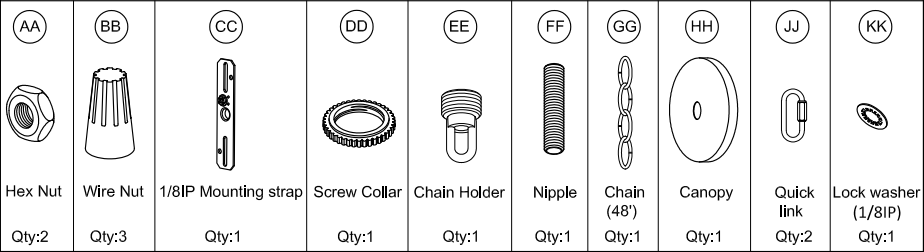
HARDWARE CONTENTS
(not actual size)
IMPORTANT: If any parts are missing or damaged, do not proceed with installation. Contact the original place of purchase to arrange for replacement parts.
Safety Information
Critical Safety Information (Read This First)
Your safety is the most important thing. Please read and follow these warnings exactly.
- Turn Off the Power. This is non-negotiable. Go to your main circuit breaker panel and turn off the electricity to the room where you are working.
- Double-Check. Use a voltage tester on the wires to absolutely confirm there is no electrical current flowing.
- 90°C Supply Conductors. There is a risk of fire. Only use minimum 90°C supply conductors. If you are unsure, consult a qualified electrician to ensure the correct branch circuit conductor is used.
- Glass is Fragile. Handle all glass shades and bulbs with care.
- Support the Weight. The full weight of the chandelier must be supported by the chain, never by the electrical wires.
- Special Controls. If you are using a dimmer or other control device with this fixture, follow the device’s instructions carefully to ensure full compliance with N.E.C. requirements.
Preparation
- Before beginning installation, make sure all parts are included using the contents diagrams. If any part is missing or damaged, do not attempt to assemble, install or operate the product.
- Estimated assembly time: 30 minutes.
- Tools required for assembly (not included): Phillips screwdriver, pliers, wire stripper, safety glasses, electrical tape, ladder.
Care, Maintenance
Care, Maintenance & Glass Shade Replacement
Proper care keeps your chandelier looking beautiful for years.
- Cleaning: Always shut off the main power supply before cleaning. To clean, wipe the metal parts and glass shades with a soft, dry, or slightly damp cloth. Never use abrasive cleaners or any product that contains alcohol, as this will damage the finish.
- Glass Shade Replacement: If a glass shade breaks, do not panic. Glass is the most common replacement part for Progress Lighting fixtures. You can search online for “Progress Lighting P400327 replacement glass shade” or contact a lighting replacement parts store. Be sure to have your model number ready.
- Socket Ring: If a socket ring is lost or stripped, a similar ring for a medium base socket is a common replacement part.
Assembly Instructions
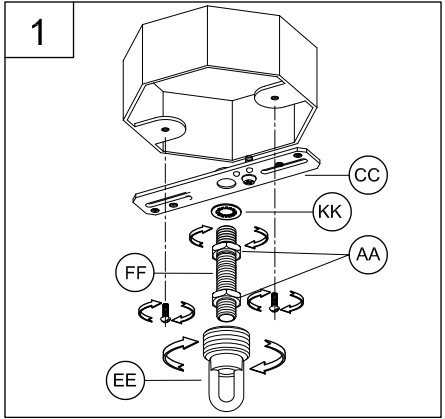
- Install the chain holder (EE) onto the nipple (FF). Next, loosely thread the hex nuts (AA) onto the nipple (FF) and then thread this assembly onto the mounting strap (CC) with the lock washer (KK). Install this assembly to the outlet box using the mounting screws supplied with the outlet box (not included).
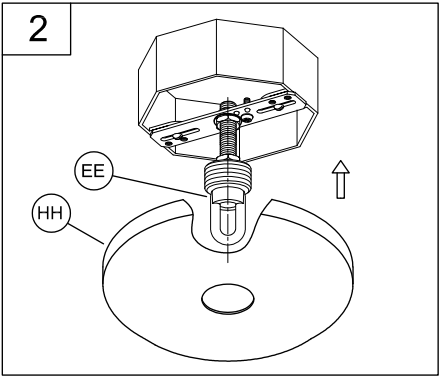
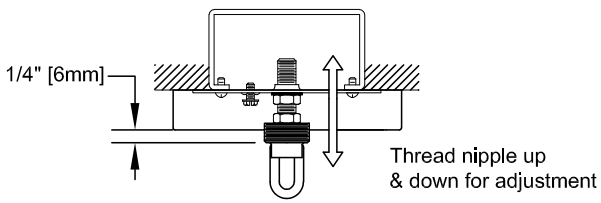
- In this step, you will adjust the depth of the chain holder in relation to the canopy depth.
-
- Take the canopy (HH) and slip it over the chain holder (EE). You will need to adjust the chain holder so at least 1/4″ of the threaded portion is exposed through the canopy hole. This is done by adjusting the depth of the nipple (FF) on the mounting strap (CC). When the chain holder (EE) is correctly adjusted, remove the canopy (HH) and tighten the top hex nut (AA) against the mounting strap (CC) and the bottom hex nut (AA) against the chain holder (EE).
- Take the canopy (HH) and slip it over the chain holder (EE). You will need to adjust the chain holder so at least 1/4″ of the threaded portion is exposed through the canopy hole. This is done by adjusting the depth of the nipple (FF) on the mounting strap (CC). When the chain holder (EE) is correctly adjusted, remove the canopy (HH) and tighten the top hex nut (AA) against the mounting strap (CC) and the bottom hex nut (AA) against the chain holder (EE).
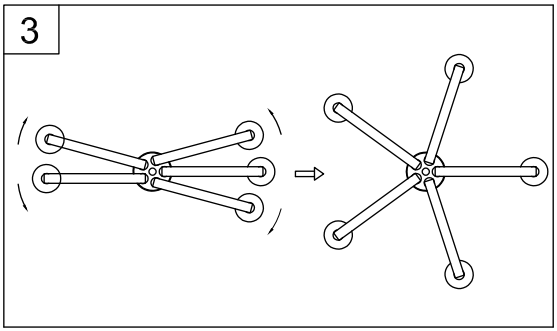
- Equally, adjust the arms by carefully turning them out from the center.
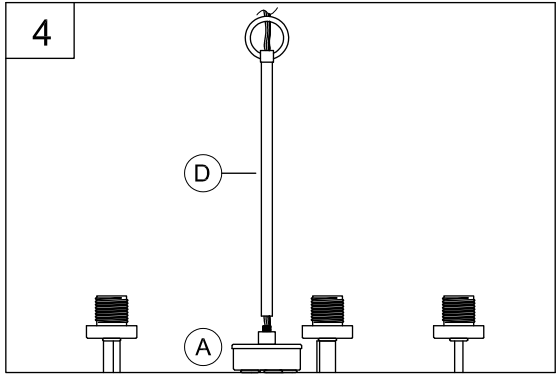
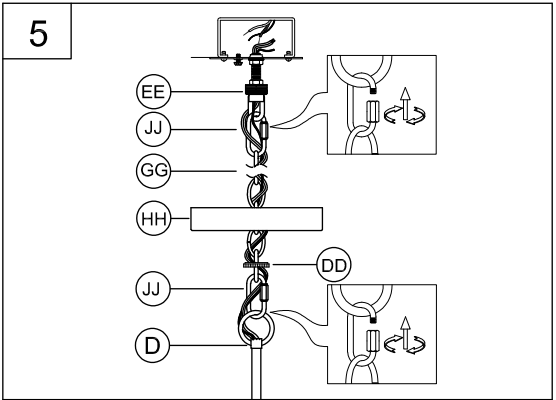
- Pass the wires through the stem (D). Attach the stem (D) to the fixture (A), and secure it tightly.
- NOTE: During this step, determine the hanging length of your fixture by removing chain links (GG) and optionally cutting the electrical and ground wire to length.
Do NOT cut electrical or ground wires until this overall length is determined. Leave AT LEAST 6 inches MINIMUM of wire past the chain holder (EE) to allow for easy connections in step 6.
(Chain links can be spread open with 2 pairs of pliers. Twist the split link ends in opposite directions and close by squeezing them back together.)
- NOTE: During this step, determine the hanging length of your fixture by removing chain links (GG) and optionally cutting the electrical and ground wire to length.
- Once the hanging length is determined, use the quick link (KK) to lock both ends of the chain (GG) to the chain holder (EE) and stem-loop (D).
You can now weave the wires through every third chain link (GG). Continue to pass the wires AND chain through the screw collar (DD) and canopy (HH).
- Strip 3/8″ of insulation from the electrical wire ends. Using wire nuts (BB), connect the RIBBED fixture wire to the WHITE supply wire from the outlet box; connect the SMOOTH fixture wire to the BLACK supply wire.
Connect the fixture ground wire and supply ground wire using a wire nut or by fastening to the ground screw on the mounting strap. Push all wire connections into the outlet box.

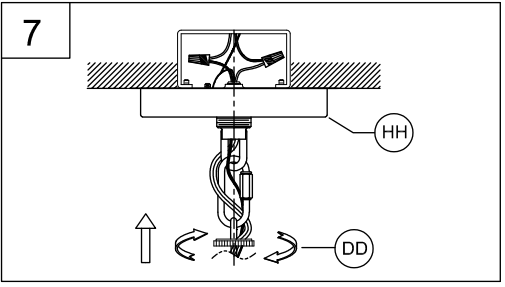
- Tuck the wires into the junction box and slip the canopy (HH) over the chain holder. Thread the screw collar (DD) onto the chain holder to secure the canopy tightly to the ceiling.
- Attach the glass shade (B) to the fixture (A) using the socket ring (C) to secure it tightly.
Thread lamps (not included) into the fixture sockets. Use 60-watt MAX incandescent medium base lamps, SBCFL or SBLED.
Troubleshooting & Error Code Guide
If your chandelier is not working as expected, use this table before calling a professional.
| Problem | Most Likely Cause | How to Fix It |
|---|---|---|
| Chandelier does not turn on | Power is off, or bulb is loose/dead. | 1. Verify the circuit breaker is on. 2. Check the wall switch. 3. Make sure bulbs are screwed in tightly. 4. Replace a bulb with a new, known-working bulb. |
| Light flickers or is intermittent | Loose wire connection or faulty bulb. | 1. Tighten the bulb. 2. If the problem persists, turn off the power and check the wire nut connections inside the canopy. |
| Glass shade is loose or wobbles | Socket ring is not tight. | Carefully tighten the socket ring. You can also buy a socket tool accessory for extra leverage. |
| Humming noise from the fixture | Incompatible dimmer switch or bulb. | This fixture is designed to be dimmable, but some older dimmers or non-dimmable bulbs can cause a hum. Use compatible dimmable LED bulbs (SBLED) or consult an electrician. |
WARRANTY AND EXCLUSIVE REMEDY
Progress products, when properly installed and under normal conditions of use, are warranted to our customers only to be free from defects in material and workmanship at the time of shipment. All warranty claims must be asserted within one year from the date of purchase of the subject items; thereafter, warranty claims will not be honored. The customer’s sole remedy for a warranty claim or otherwise shall be limited to repair or replacement of the subject product if it is shown to have been defective in material or workmanship at the time of shipment. Progress’s sole and maximum liability for a defective product shall never exceed the cost of the subject product.
EXCEPT FOR SUCH A WARRANTY AND EXCLUSIVE REMEDY AS STATED (AND THE EXPRESS WARRANTY OF TITLE), WE DISCLAIM ALL OTHER WARRANTIES, WHETHER EXPRESS OR IMPLIED, AND SPECIFICALLY DISCLAIM THE IMPLIED WARRANTIES OF MERCHANTABILITY AND FITNESS FOR A PARTICULAR PURPOSE. IN NO EVENT SHALL WE BE LIABLE TO THE CUSTOMER IN WARRANTY, CONTRACT, NEGLIGENCE, STRICT LIABILITY, OR OTHERWISE, FOR ANY DAMAGES, WHETHER INCIDENTAL OR CONSEQUENTIAL, WHICH ARE ALLEGED TO BE CAUSED BY ONE OR MORE OF OUR PRODUCTS, BEYOND THE COST TO THE CUSTOMER OF THE SUBJECT PRODUCT OR PRODUCTS.
Therefore, the customer’s sole and exclusive remedy against us for breach of the warranty, breach of contract or negligence or strict liability, or otherwise shall be limited to repair or replacement of the subject product at our option (excluding installation and removal charges which shall not be our liability) or, if we choose, a refund of the purchase price. In no case does our warranty and exclusive remedy extend to anybody other than our customers. Our customers are not authorized to extend warranties or remedies on our behalf to anyone. Such unauthorized extensions of warranties or remedies by the customer shall remain the customer’s responsibility. The customer is responsible for determining the suitability of our products for customer use or resale, or for incorporating them into objects or for applications that the customer designs, assembles, constructs, or manufactures.
Frequently Asked Questions
Q1: What type of light bulb does the Progress Lighting P400327 use?
A: This chandelier uses standard medium base (E26) bulbs. The maximum allowed wattage is 60 watts per bulb. You can use incandescent, SBCFL, or SBLED bulbs.
Q2: My chandelier is hanging crooked. What should I do?
A: First, make sure all the decorative arms are equally adjusted outward from the center. If it’s still crooked, the issue is likely the chain. Check that the chain was cut evenly and that the quick link is closed completely.
Q3: Where can I find a replacement glass shade for the P400327?
A: You can find replacement glass shades at major home improvement stores, online lighting retailers, or specialized replacement parts websites. Your best bet is to search for “Progress Lighting P400327 glass shade replacement” and have your model number ready to ensure compatibility.
Q4: Does this chandelier work with a dimmer switch?
A: Yes, this Progress Lighting chandelier is compatible with a standard dimmer switch. However, you must ensure the light bulbs you install are also labeled as “dimmable” for the feature to work correctly.
Q5: What is the warranty on the Progress Lighting P400327?
A: The Progress Lighting P400327 comes with a 1-year limited warranty. This warranty covers defects in material and workmanship under normal use from the date of purchase. It does not cover damage from improper installation, misuse, or normal wear and tear.
Download PROGRESS LIGHTING P400327 Manual Here!
PROGRESS LIGHTING P400327 5 Light Chandelier Installation Guide Manual-productsmanuals.com
How do I adjust the hanging length of the Progress Lighting 5 Light Chandelier? Please Guide me
To adjust the hanging length of the chandelier here are the steps:
1. Decide how long you want the chandelier to hang. You can do this by removing some chain links and if needed cutting the ground wires to the right length. Don’t cut the wires until you are sure about the length.
2. Make sure you have least 6 inches of wire left past where the chain holder is. This will make it easy to connect things later.
3. Use pliers to open the chain links. Twist the ends in directions and then squeeze them back together to close.
4. When you are happy with the hanging length use the link to attach both ends of the chain to the chain holder and the stem-loop.
5. Thread the wires through every chain link. Keep passing the wires and chain, through the collar and canopy.
By following these steps you can adjust how high or low the Progress Lighting P400327 5 Light Chandelier hangs to fit what you want.