
Introduction
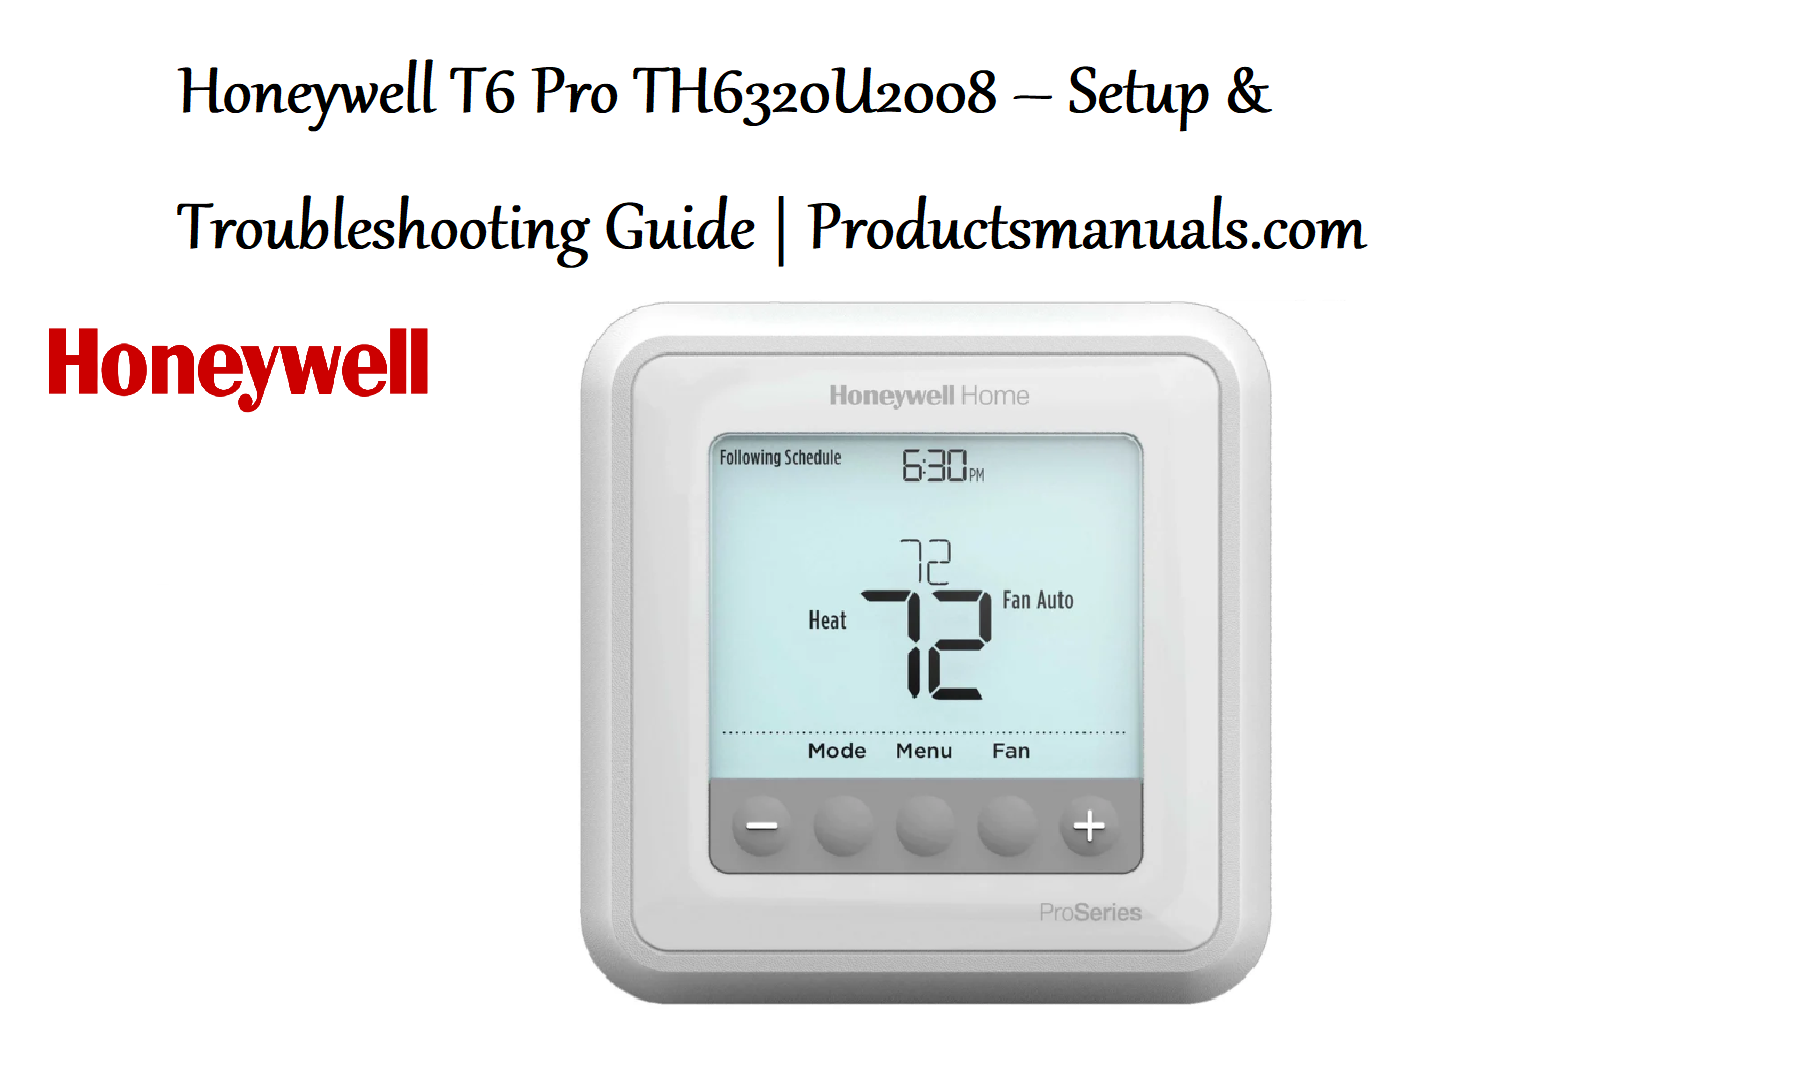
The Honeywell Home T6 Pro (model TH6320U2008) is a 7-day programmable thermostat designed for use with heat pump and conventional HVAC systems. It supports up to 3 Heat / 2 Cool heat pump systems and up to 2 Heat / 2 Cool conventional systems, making it one of the most versatile non-connected thermostats in Honeywell’s lineup. It features a large soft-key interface, filter change reminders, and optional wired indoor/outdoor sensors for advanced control like compressor lockout and dual-fuel operation. This manual covers everything from installation and installer setup (ISU) configuration to scheduling, alert codes, and troubleshooting.
Prioritize comfort in your home with the T6 Pro Programmable Thermostat. The easy-to-use thermostat automatically heats or cools your home to maintain the temperature you like the most. With 7-day flexible scheduling, you can program your thermostat for the week ahead and adjust it easily if your plans change.
The large backlit display shows the temperature and comes with a real-time clock that automatically adjusts for Daylight Savings Time. Use the temporary or permanent hold settings to override your schedule, and receive reminders when it’s time to change the filters or the batteries.
Product Overview
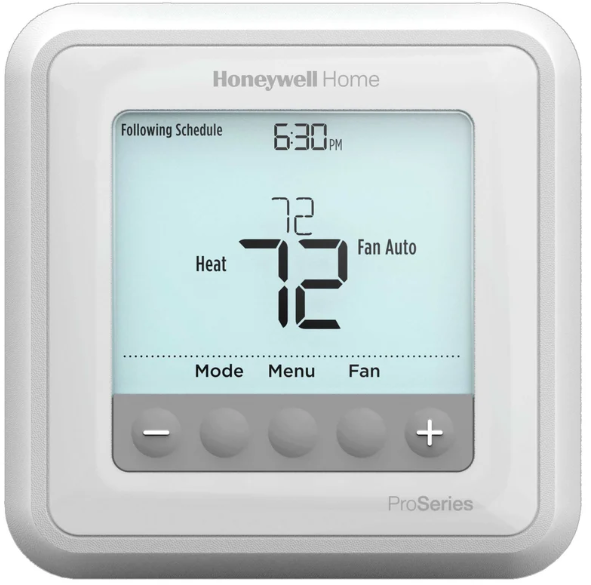
The T6 Pro TH6320U2008 is a square, wall-mounted thermostat with a large LCD display and soft-key controls. It uses the Honeywell UWP (Universal Wall Plate) mounting system, which is standard across all T Series thermostats, making it easy to upgrade to a connected model later if desired. The thermostat can be powered either by hardwired C-wire (24 VAC) or by two AA alkaline batteries (battery or C-wire). It supports dual-fuel operation (heat pump with backup furnace) and optional wired sensors for indoor and outdoor temperature readings.
Full Specifications
| Specification | Detail |
|---|---|
| Model | TH6320U2008/U (T6 Pro Programmable Thermostat) |
| System Compatibility | Up to 3 Heat / 2 Cool Heat Pump; Up to 2 Heat / 2 Cool Conventional |
| Programmability | 7-day, 5-2 day, 5-1-1 day, or non-programmable |
| Display | Large LCD with soft-key controls, backlight |
| Mounting | UWP (Universal Wall Plate) mounting system |
| Power Method | Battery (2 AA) or Hardwired (C-wire) |
| Supply Voltage | 20 to 30 Vac |
| Operating Temperature | 37°F to 102°F (2.7°C to 39°C) |
| Operating Humidity | 5% to 90% RH, non-condensing |
| Dimensions | 4-1/16″ L x 4-1/16″ W x 1-3/32″ D (103.6 mm x 103.6 mm x 28 mm) |
| Accuracy | ±1°F (±0.5°C) |
| Switch Positions (System) | HEAT-OFF-COOL-AUTO-EM.HEAT |
| Switch Positions (Fan) | AUTO-ON-CIRC-FOLLOW SCHEDULE |
| Optional Sensors | Wired indoor/outdoor sensors (TH6320U and TH6220U only) |
| Dual Fuel | Optional (TH6320U and TH6220U only) |
| Warranty | 5 years |
| In-the-Box | Thermostat, UWP mounting system, J-box adaptor, decorative cover plate, screws and anchors, Installation Guide, User Guide, 2 AA batteries |
Key Features
- 7-Day / 5-2 / 5-1-1 Programmability: Choose the scheduling format that fits your routine. You can also disable programming entirely for manual control.
- Heat Pump & Conventional Compatibility: Works with up to 3H/2C heat pumps or 2H/2C conventional systems. Supports dual-fuel operation when configured with a wired outdoor sensor.
- Optional Wired Sensors: Add a wired indoor or outdoor sensor (sold separately) for advanced features like compressor lockout (balance point) and backup heat lockout.
- Filter Change Reminders: Programmable reminders based on fan run time or calendar days (ISU #711 and #712).
- Circulate Mode: Runs the fan for 30% of each hour without heating or cooling to distribute air evenly.
- Soft-Key Interface: The bottom row of buttons changes function based on the on-screen menu, making navigation simple.
- Large Backlit Display: Easy to read in low light; brightness adjustable via ISU settings.
GET STARTED
Professional installation gets professional results. Find an authorized professional near you to complete your installation.
How to Use
What’s in the Box
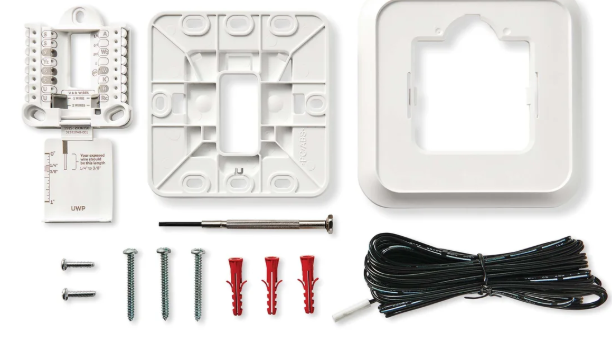
- Honeywell T6 Pro Programmable Thermostat (TH6320U2008)
- UWP mounting system (wall plate)
- J-box adaptor
- Small decorative cover plate
- Screws and anchors
- Installation Guide and User Guide
- 2 AA alkaline batteries
Installation Summary
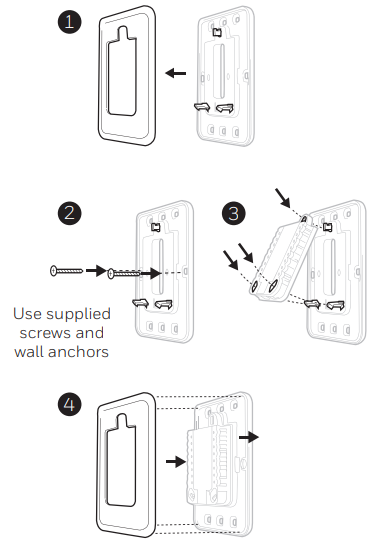
Important: Turn off power to your HVAC system at the breaker before starting. The T6 Pro can be powered by batteries alone, but a C-wire is recommended for full functionality and to avoid battery drain.
- Turn off power at the breaker box.
- Remove the old thermostat from the wall plate. Take a picture of the wiring for reference.
- Mount the UWP wall plate:
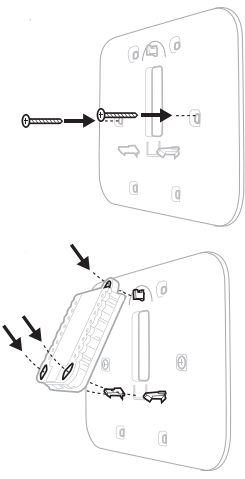
using the provided screws and anchors. Use the J-box adaptor if mounting to an electrical box. - Connect the wires:
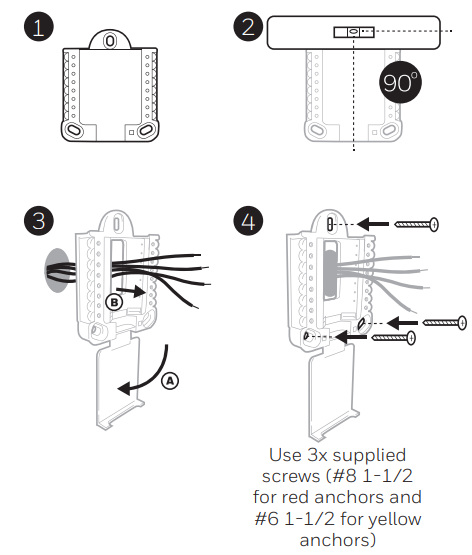
to the UWP terminals according to your system type. Refer to the Installation Guide for wiring diagrams. - Attach the thermostat to the wall plate.
- Install the 2 AA batteries:
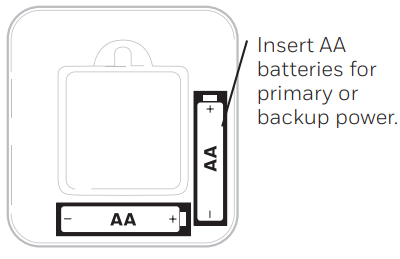
(if not using C-wire power). - Restore power and configure the thermostat via Installer Setup (ISU).
Installer Setup (ISU)
The Installer Setup menu contains all the configuration options for your system. To enter ISU:
- Press and hold the CENTER and + buttons together for approximately 5 seconds until “ISU” appears on the display.
- Press the button under Select to enter the ISU menu.
- Press Select to cycle through the setup options.
- Press + or – to change values.
- Press Home when finished to save settings and return to the main screen.
Key ISU Settings:
| ISU # | Setting | Description |
|---|---|---|
| 130 | Outdoor Sensor | Set to “1” if a wired outdoor sensor is installed. “0” means no outdoor sensor, disabling lockout features. Required for compressor lockout on TH6320U |
| 200 | System Type | Set to “2” for Heat Pump, “1” for Conventional |
| 220 | Compressor Stages | Number of compressor stages in the system |
| 221 | Backup Heat Stages | Number of backup heat stages |
| 355 | Compressor Lockout / Balance Point | Set to “_” (disabled) or 5°F or less to meet PTCS specifications |
| 356 | Outdoor Lockout Backup | Set to 35°F or less. Requires ISU 130 set to “1” to function |
| 500 / 516 | Wired Indoor Sensor | Configure for 10K or 20K sensor type. Not available on TH6210U |
| 711 / 712 | Filter Reminders | Set filter change reminders based on fan run time or calendar days |
Set the time and date
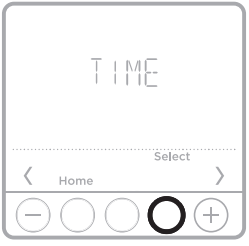
Time
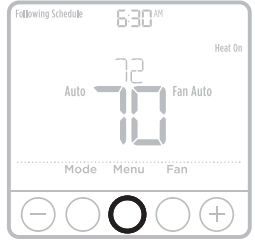
- Press Menu on your thermostat.
- Press + or – to go to TIME. Press Select.
- Press + or – to choose between 12 or 24 hour Press Select.
- Use + or – to adjust the hour. Press Select.
- Use + or – to adjust the minutes. Press Select to exit Time menu.
Date
- If previously setting time, continue to Step 2.
- If at the Home screen, press Menu on your thermostat.
- Press + or – to go to DATE. Press Select.
- Use + or – to adjust year. Press Select.
- Use the + or – to adjust month. Press Select.
- Use the + or – to adjust day.
- Press Select to save and exit Date menu.
Programming Options
The T6 Pro supports four programming formats:
- 7-Day: Each day can have a different schedule.
- 5-2 Day: Weekdays share one schedule, weekends share another.
- 5-1-1 Day: Weekdays, Saturday, and Sunday each have separate schedules.
- Non-Programmable: Scheduling is disabled; the thermostat operates manually.
To set a schedule, press Menu, select PROG, and follow the on-screen prompts to set time periods and temperatures for each day or group of days.
Using the Soft-Key Interface
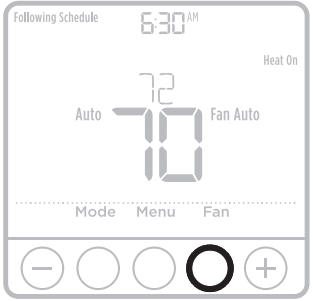
The bottom row of buttons on the thermostat changes function based on the current menu. The main screen displays:
- Current temperature
- Set point temperature
- System mode (Heat, Cool, Auto, Off, Em. Heat)
- Fan mode (Auto, On, Circ)
- Menu button to access programming and settings
- Up/Down arrows to adjust temperature
Fan Settings
- Auto: Fan runs only when heating or cooling is active.
- On: Fan runs continuously for air circulation.
- Circ (Circulate): Fan runs for approximately 30% of each hour to keep air moving without heating or cooling. This is more energy-efficient than “On” and provides better air distribution.
- Follow Schedule: Fan operates according to the programmed schedule.
Alerts and Error Codes
The T6 Pro displays alert codes when issues arise. To view, snooze, or clear alerts:
- Press Menu and navigate to ALRT.
- Press Select to view active alerts.
- Press Select again to snooze a reminder for 7 days.
- To clear an alert, press Select, then press + until “CLER” appears, and press Select to clear.
| Code | Meaning | Solution |
|---|---|---|
| 164 | L terminal energized at equipment | Indicates a problem with the heat pump. Contact a qualified HVAC technician |
| 170 | Memory failure | Replace the thermostat |
| 171 | Set Date/Time reminder | Set the date and time on the thermostat |
| 173 | Internal sensor failure | Replace the thermostat |
| 177 | Invalid wired indoor sensor reading | Check indoor sensor and wires. Verify ISU settings #500 and #516 match the sensor type (10K or 20K) |
| 178 | Invalid wired outdoor sensor reading | Check outdoor sensor and wires. Verify ISU #130 is set correctly |
| 181 | Replace filter 1 reminder | Replace the furnace filter and dismiss the alert. Configured via ISU #711 |
| 182 | Replace filter 2 reminder | Replace the furnace filter and dismiss. Configured via ISU #712 |
| 405 | Low battery | Replace the 2 AA batteries. “BATT” also appears on the home screen |
| 407 | Critically low battery | Replace the batteries immediately |
| 54 | Thermostat humidity sensor error | Contact dealer to replace the thermostat |
Troubleshooting & Common Problems
| Problem | Likely Cause | What to Try |
|---|---|---|
| Blank display | Dead batteries or no power | If battery-powered, replace the AA batteries. If hardwired, check the circuit breaker and furnace power switch. Try powering with batteries to test |
| “BATT” message on screen | Low batteries | Replace the 2 AA alkaline batteries |
| Heating or cooling not responding | System type misconfigured, or wiring issue | Verify ISU #200 (system type) is correct. Check that all wires are securely connected to the UWP terminals |
| Temperature settings do not change | Schedule is active, or thermostat is locked | Press + or – to adjust temperature and override the schedule temporarily. If the thermostat is locked, unlock via Menu > Unlock (enter PIN, scroll to 0 to disable) |
| “Cool On” or “Heat On” flashing | Compressor protection delay | Wait 5 minutes for the delay to expire. This prevents equipment damage from rapid cycling |
| Thermostat resets to 70°F at night | Wiring issue or firmware glitch | Perform a factory reset via the menu. Check wiring connections for loose wires |
| Display shows only one bar after battery replacement | Temporary display glitch | Press and hold CENTER and + for 3 seconds to enter advanced menu. Navigate to TEST and press Select to run a system test |
| Locked thermostat (55555 code) | Security feature activated | Perform a full power cycle: remove batteries and disconnect power for 5 minutes. If unresolved, contact support |
Frequently Asked Questions
- Is the T6 Pro TH6320U2008 Wi-Fi enabled?
No. This model is a non-connected, programmable thermostat. It does not support Wi-Fi or app control. For Wi-Fi, consider the Lyric T6 Pro Wi-Fi (TH6320WF) or T9 Smart thermostat. - Does it require a C-wire?
The T6 Pro can run on batteries alone (2 AA) or be hardwired with a C-wire. A C-wire is recommended for full functionality and to avoid frequent battery replacements. The thermostat uses the UWP mounting system. - Can I use it with a heat pump?
Yes. The TH6320U2008 supports up to 3 Heat / 2 Cool heat pump systems, including dual-fuel operation when configured with a wired outdoor sensor. - How do I enter the Installer Setup (ISU) menu?
Press and hold the CENTER and + buttons together for approximately 5 seconds until “ISU” appears. Press Select to enter. - What are the most important ISU settings?
The critical settings are ISU #200 (system type: 2 for heat pump), ISU #220 (compressor stages), ISU #130 (outdoor sensor: 1 if installed), and ISU #355 (compressor lockout). These must be configured correctly for proper system operation and efficiency. - How do I set a schedule?
Press Menu, navigate to PROG, and follow the on-screen prompts. The T6 Pro supports 7-day, 5-2 day, 5-1-1 day, or non-programmable formats. - How do I bypass the schedule temporarily?
Press + or – to adjust the temperature. The thermostat will hold that temperature until the next scheduled period. - What is Circulate mode?
Circulate mode runs the fan for approximately 30% of each hour without heating or cooling. It helps distribute air evenly and improve comfort without the energy cost of running the system continuously. - How do I clear an alert code?
Press Menu, navigate to ALRT, press Select to view alerts, press Select again to snooze (7 days), or press + until “CLER” appears and press Select to clear. - How do I unlock the thermostat?
Touch the lock icon, enter your PIN by touching the +/- icons and pressing SELECT after each digit. To disable the lock, navigate to Menu > Unlock and scroll to 0.
Tips
- Configure ISU settings carefully: Entering Installer Setup and accidentally changing settings can cause system malfunction. Write down your original settings before making changes.
- Use a wired outdoor sensor for heat pumps: This enables compressor lockout and backup heat lockout, which can improve efficiency and prevent unnecessary backup heat usage.
- Set filter reminders: Use ISU #711 and #712 to set filter change reminders based on calendar days or fan run time. This helps maintain airflow and system efficiency.
- Use Circulate mode for even temperatures: Circulate mode is ideal for homes with hot or cold spots. It keeps air moving without the cost of running the full system.
- Check batteries annually: Even if hardwired, the AA batteries provide backup during power outages. Replace them annually to prevent “BATT” alerts.
- Keep the thermostat in a central location: Avoid placing it near drafts, direct sunlight, or heat sources for accurate temperature readings.
Safety Information
- Electrical hazard: Turn off power at the breaker before installing or servicing the thermostat. Failure to do so can cause electrical shock or equipment damage.
- Compressor protection: The thermostat includes a compressor protection delay (typically 5 minutes). Do not cycle the compressor rapidly during testing to prevent equipment damage.
- Mercury notice: If you are replacing a thermostat that contains mercury, do not dispose of it in the trash. Contact your local waste management authority for proper recycling instructions.
- Battery safety: Use only AA alkaline batteries. Do not mix old and new batteries. Remove batteries if the thermostat will be stored for an extended period.
- Wiring: Use 18- to 22-gauge thermostat wire. Ensure all connections are secure to prevent intermittent operation.
- Children: The thermostat is not a toy. Keep the touchscreen locked if young children are present.
Related Manuals
If this guide was helpful, here are a few more popular manuals from productsmanuals.com that you might find useful:
- Honeywell Home T5 Smart Thermostat – Geofencing, Wi-Fi Setup & Scheduling
Explore Honeywell’s connected thermostat with app control and smart features. - Ecobee Smart Thermostat Premium – Air Quality Monitoring & Smart Sensors
Compare another top smart thermostat with built-in Alexa and room sensors. - Samsung Galaxy Watch 7 – Health Sensors, Galaxy AI & Battery Tips
Master ECG, body composition, sleep apnea detection, and more. - LG Dual Inverter AC Manual – Remote, Self-Clean & Error Codes
Cool efficiently and fix blinking lights with simple steps. - Dell Inspiron 15 3520 Manual – Laptop Setup, Upgrades & Troubleshooting
Upgrade RAM and SSD, and fix common performance issues.
Official Honeywell Documentation
-
Honeywell-T6-Pro-TH6320U2008 – Setup-&-Troubleshooting-Guide-PDF
Honeywell provides a full HTML installation manual for the T6 Pro series covering TH6320U2008, TH6220U2000, and TH6210U2001. It includes wiring diagrams, ISU settings, and installation steps.
Browse all guides at productsmanuals.com .
Copyright 2026 productsmanuals.com All rights reserved. This Honeywell T6 Pro TH6320U2008 manual is original content and may not be copied, republished, or redistributed without written permission. Honeywell, Honeywell Home, T6 Pro, and the Honeywell logo are trademarks of Honeywell International Inc. This guide is unofficial and not affiliated with Honeywell.
