
Introduction
Why This Guide Is Handy
Alienware ships the Aurora R16 with a power cord, a quick‑start leaflet, and a warranty card. The full manual is a digital PDF that covers multiple configurations. There’s no printed guide that explains how to configure Alienware Command Center, add a second SSD, understand the lighting zones, or troubleshoot the liquid cooling. Thousands of gamers search for an “Alienware Aurora R16 manual” each month because they want clear, practical answers. This companion provides exactly that.
What Arrives in the Box

Your package includes:
- The Aurora R16 desktop tower (the large, Legend 3 design chassis)
- A power cord (region‑specific)
- A Quick‑Start Guide and safety booklet
- Depending on your order, a wired Alienware keyboard and mouse
No monitor, HDMI/DisplayPort cable, or additional accessories are included. The system uses a proprietary motherboard, an Intel 13th/14th Gen CPU or AMD Ryzen 7000 series, and an NVIDIA GeForce RTX 40‑series GPU.
Physical Layout and Port Tour

The R16 has a distinctive curved chassis with a honeycomb air intake on the front and an AlienFX‑lit Alien head logo.
Front panel (top):
- Power button: An illuminated Alienware head. Press once to turn on. The light colour can be customised in AWCC.
- Two USB 3.2 Gen 1 Type‑A ports (5 Gbps) – for quick peripheral connections.
- One USB 3.2 Gen 1 Type‑C port (5 Gbps) – suitable for modern external drives.
- Headphone/microphone combo jack (3.5mm).
Rear panel (top to bottom):
- Audio jacks (6 ports) for surround‑sound setups.
- USB ports: Up to 8 USB‑A (various speeds) and 1 USB‑C 3.2 Gen 2 (10 Gbps). The exact number depends on your motherboard.
- RJ‑45 Ethernet port (2.5 Gigabit on most models).
- Graphics card ports (your RTX card occupies the horizontal slots): typically 3 DisplayPorts and 1 HDMI.
- Power supply unit (PSU) port: The kettle‑plug connector at the very bottom. The PSU is a standard ATX form‑factor on some models, making future upgrades easier.
First‑Time Startup and Windows OOBE
- Connect your monitor to the graphics card’s HDMI or DisplayPort, not the motherboard’s rear I/O. Plug in the keyboard and mouse to any USB‑A port.
- Connect the power cord and switch on the PSU (if there’s a hard switch on the back). Press the front power button. The Alienware head logo glows.
- The system will POST and boot into Windows 11 (Home or Pro, depending on your order). The initial Windows Out‑Of‑Box Experience (OOBE) will ask for your region, keyboard layout, and network. Sign in with your Microsoft account or create a local one.
- Once on the desktop, immediately check for Windows updates (Start > Settings > Windows Update) and install all pending updates. This ensures you have the latest drivers, including chipset and GPU.
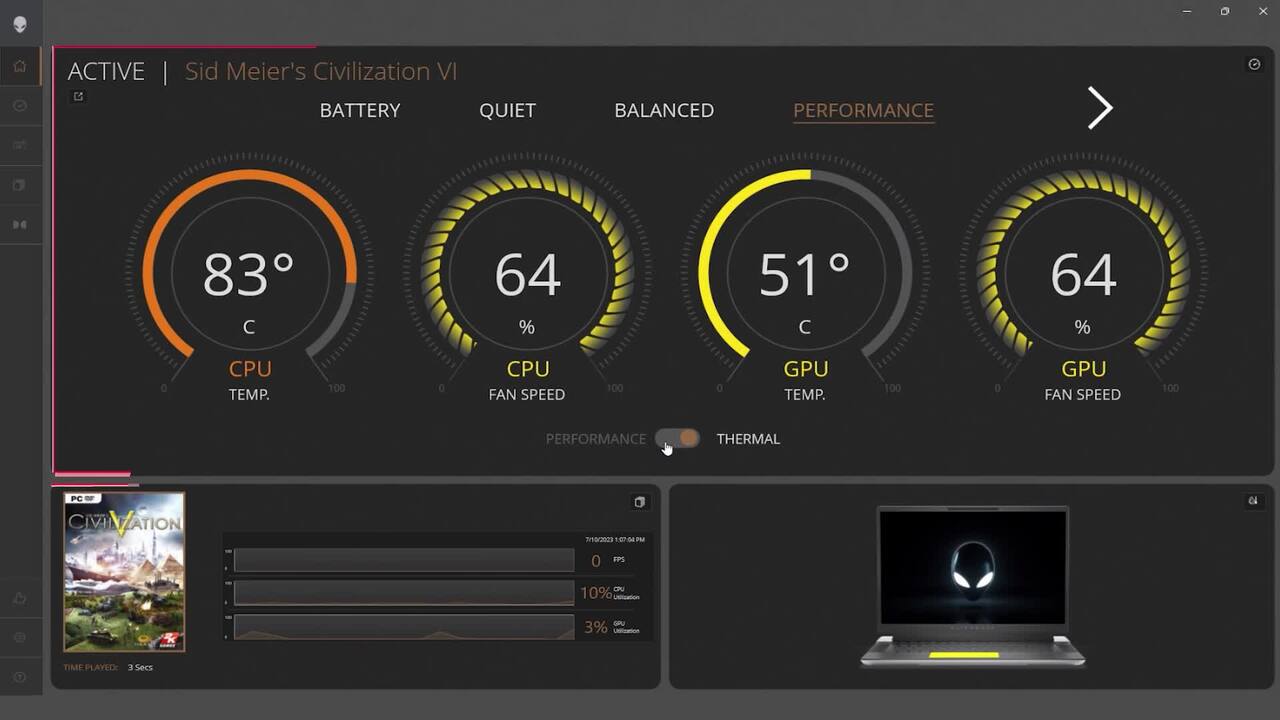
Alienware Command Center (AWCC) Explained
Alienware Command Center (AWCC) is the control hub for your R16. If it’s not installed, download it from Dell’s support site.
Key features:
- Home Tab: Shows system vitals (CPU temperature, GPU clock, fan speeds) in a game‑centric dashboard.
- Thermal Profiles: Choose from Balanced, Performance, Cool, or Quiet. “Balanced” is fine for daily use; “Performance” ramps up fans for gaming. You can also create custom fan curves.
- AlienFX Lighting: Customise the colour and animation of the front Alien head, the ring LED, and any Alienware peripherals. You can sync lighting across games that support AlienFX.
- Overclocking (OC): For unlocked CPUs, AWCC provides simple one‑click overclocking profiles. Use with caution and monitor temperatures.
- Library: Add your installed games and launch them from AWCC with custom performance profiles tied to each game.
If AWCC fails to open or crashes: Uninstall AWCC completely, restart the PC, and reinstall the latest version from Dell’s website.
Upgrading RAM, Storage, and Graphics Card
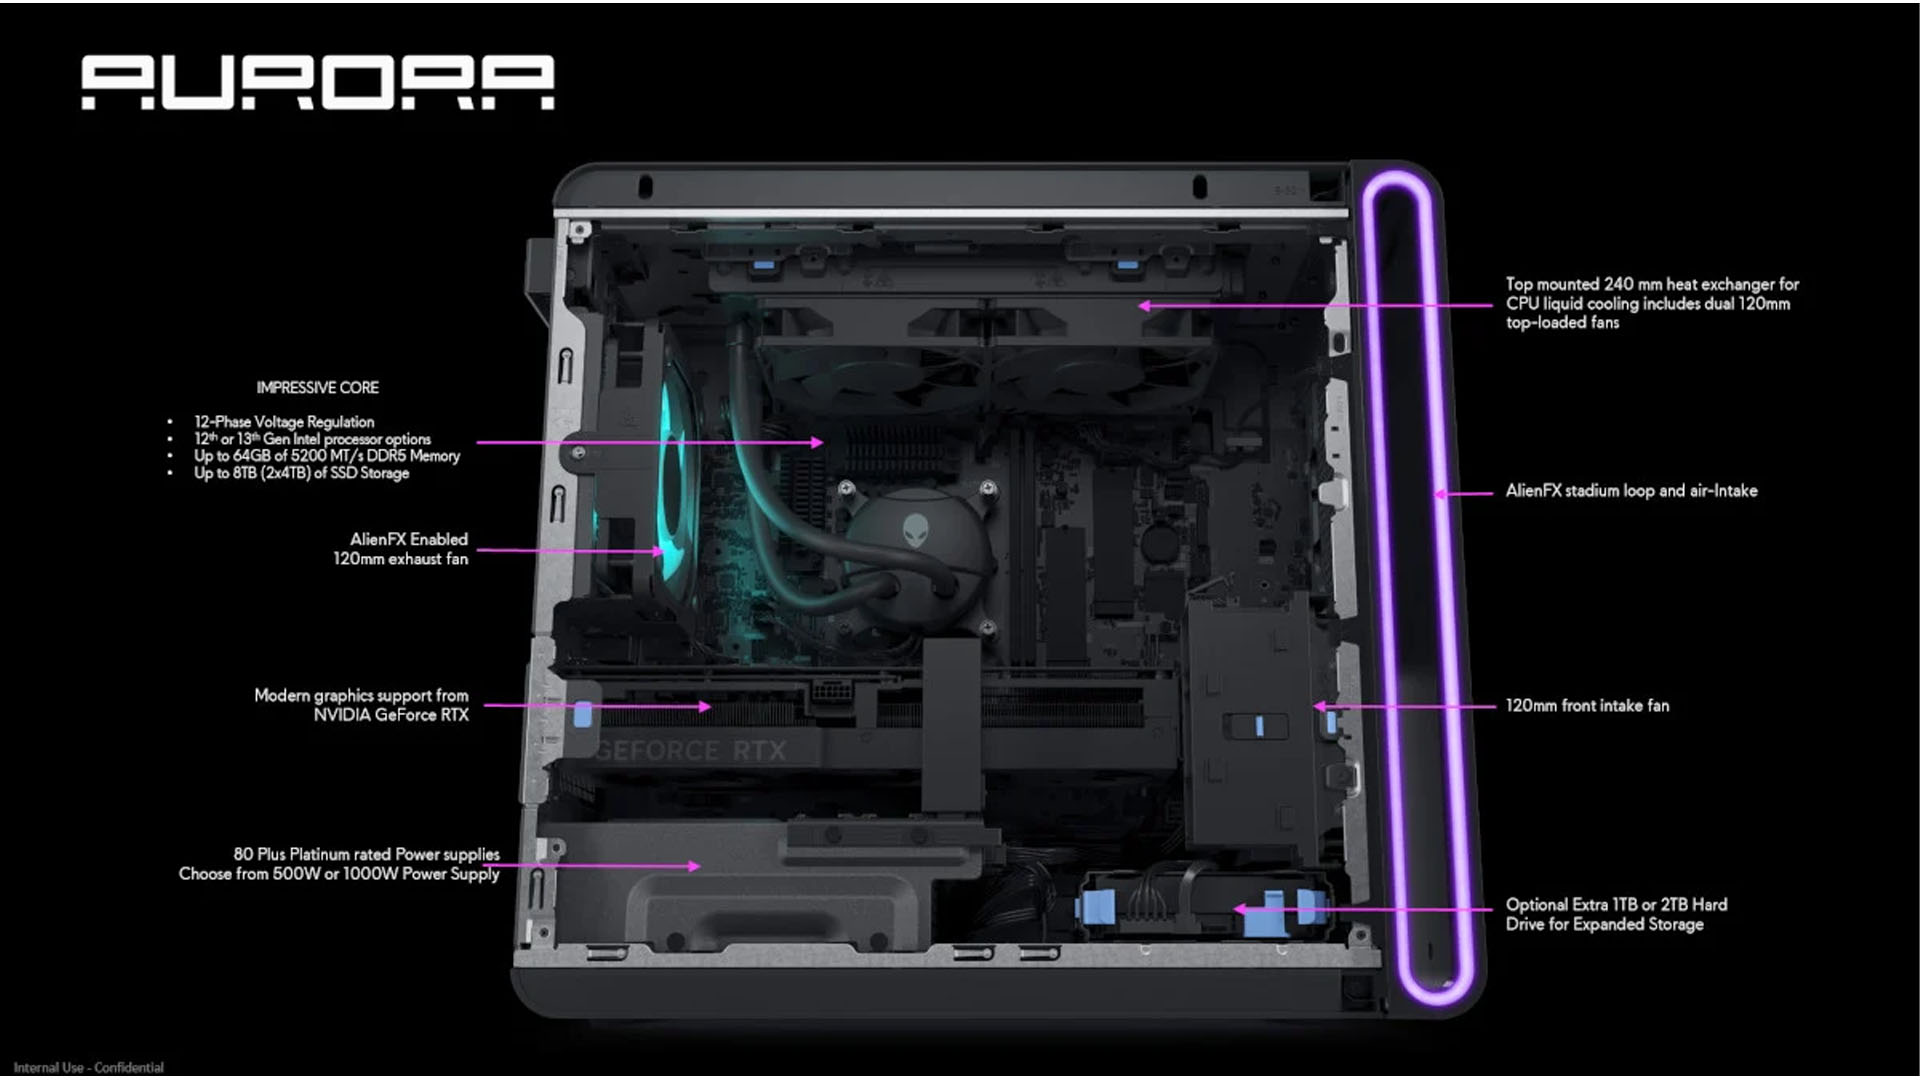
The R16’s tool‑less side panel comes off with a single captive screw at the back.
Adding a second M.2 NVMe SSD:
The motherboard has two M.2 slots. One is usually occupied by the boot drive. The second empty slot is under a small heatshield. Remove the single screw holding the shield, insert the new M.2 2280 NVMe SSD at an angle, press it flat, and screw down the shield. No cables required. Format the new drive in Windows Disk Management.
Adding a 2.5‑inch or 3.5‑inch SATA drive:
The chassis has tool‑less drive bays behind the right side panel. Slide the drive into the tray, connect the SATA data cable to the motherboard and the SATA power cable from the PSU. The cables are pre‑routed.
Upgrading RAM:
The R16 uses DDR5 desktop DIMMs. Push the retaining clips outward on the empty RAM slots, align the notch in the DIMM, and press firmly until the clips snap back. The motherboard supports up to 64GB (2x32GB) or more depending on the chipset.
Upgrading the graphics card:
Ensure the new GPU physically fits (the R16 supports most triple‑fan cards up to about 300mm). Unplug the PCIe power cables, press the release tab on the PCIe slot, remove the old card, and insert the new one. Connect the necessary PCIe power cables from the PSU. The R16’s power supply is modular on higher‑wattage configurations.
Liquid Cooling and Fan Maintenance
The R16 is typically equipped with a 120mm or 240mm AIO liquid cooler for the CPU and several system fans. There are no user‑serviceable parts inside the AIO—do not open it.
- Dust cleaning: Every 3 months, power down and open the side panel. Use a can of compressed air to blow dust out of the radiator fins (mounted on the top or front) and the GPU fans. Hold the fans still to prevent them from spinning.
- Fan noise changes: If a fan becomes loud or rattles, it may have a bearing issue. Alienware uses standard 120mm case fans that can be replaced with any PWM fan of the same size. You can unplug the fan header from the motherboard and swap it.
- AIO pump monitoring: In AWCC, you’ll see a pump RPM. It should be in the 2000–3000 RPM range. If it reads zero or abnormally low, the AIO may be failing, and you’ll see CPU temperatures rise quickly.
Troubleshooting Common Issues
| Problem | Likely Cause | What to Try |
|---|---|---|
| PC turns on but no display | Loose GPU or cable plugged into motherboard | Ensure the monitor is connected to the graphics card ports, not the motherboard’s rear I/O. Reseat the GPU in the PCIe slot. Try a different cable. |
| Alien FX lights don’t respond | AWCC service not running | Open AWCC > Alien FX tab. If the interface is blank, restart the AWCC service in Windows Services. Update AWCC to the latest version. |
| Fans run at full speed constantly | Thermal profile set to Performance or sensor error | In AWCC, switch to “Balanced” or “Cool.” If fans stay at full speed even when idle, check CPU temperatures in AWCC; if they’re normal, a firmware update may be needed. |
| PC randomly shuts down during gaming | Overheating or PSU fault | Monitor CPU/GPU temps in AWCC. If CPU exceeds 95°C, clean the AIO radiator. If temps are fine, the PSU might be tripping — ensure it’s properly ventilated and the power cable is secure. |
| Audio crackling or no sound | Audio driver conflict | Right‑click the speaker icon, choose Sound settings, ensure the correct output device is selected. Download the latest Realtek audio driver from Dell’s support page. |
| Cannot install additional SSD | M.2 slot not enabled in BIOS | In the BIOS (press F2 at startup), go to Storage and ensure the M.2 slot is set to “Enabled.” No further configuration is needed; Windows will detect the drive after you initialize it in Disk Management. |
BIOS Access and Resetting the System
Enter the BIOS: Press F2 repeatedly during startup. The Alienware BIOS is a grey‑and‑blue interface. Press F9 to load optimized defaults, then F10 to save and exit.
Boot from a USB: Insert a bootable USB drive, restart, and press F12 for the one‑time boot menu. Select the USB drive.
Factory reset Windows (keep or remove files):
Go to Start > Settings > System > Recovery > Reset this PC. Choose “Keep my files” to reinstall Windows while preserving personal data, or “Remove everything” for a clean wipe.
Clean install Windows from USB:
If the system won’t boot into Windows, create a Windows 11 installation USB on another PC. Boot from it via F12, select “Custom: Install Windows only,” delete all partitions on the primary NVMe drive, and proceed. After installation, download the Dell Support Assist tool from Dell’s website to automatically install all drivers and firmware.
Quick Reference Card
| Task | How |
|---|---|
| Enter BIOS | Press F2 at startup |
| Boot Menu | Press F12 at startup |
| Open AWCC | Search “Alienware Command Center” in Windows |
| Reset Windows (keep files) | Settings > System > Recovery > Reset this PC > Keep my files |
| Clean install Windows | Boot from USB (F12), delete partitions, install, run Dell Support Assist |
| Update drivers | Visit dell.com/support, enter Service Tag |