Why This Companion Is Here
Philips ships the Sonicare ProtectiveClean 6100 with a charging base, a travel case, a brush head, and a small quick‑start leaflet. The full manual is a folded paper that many people lose. Every day, thousands of people search for a “Philips Sonicare ProtectiveClean 6100 manual” because they want to understand the three brushing modes, what the pressure sensor does, how BrushSync works, and what the blinking lights really mean. This companion gives you all of that in plain, patient English.
What’s Inside the Box
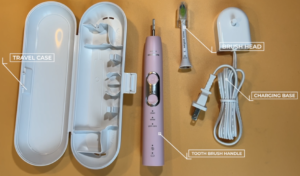
Your box includes:
- The Philips Sonicare ProtectiveClean 6100 handle (white/rose gold or black)
- One charging base with a detachable USB‑A cable (wall adapter not included)
- One premium travel case (holds the handle and two brush heads)
- One W2 Optimal White brush head (with BrushSync chip)
- A Quick‑Start Guide and warranty card
No wall adapter is included. You can plug the USB‑A cable into any standard USB port (phone charger, laptop, power bank) that outputs 5V/1A.
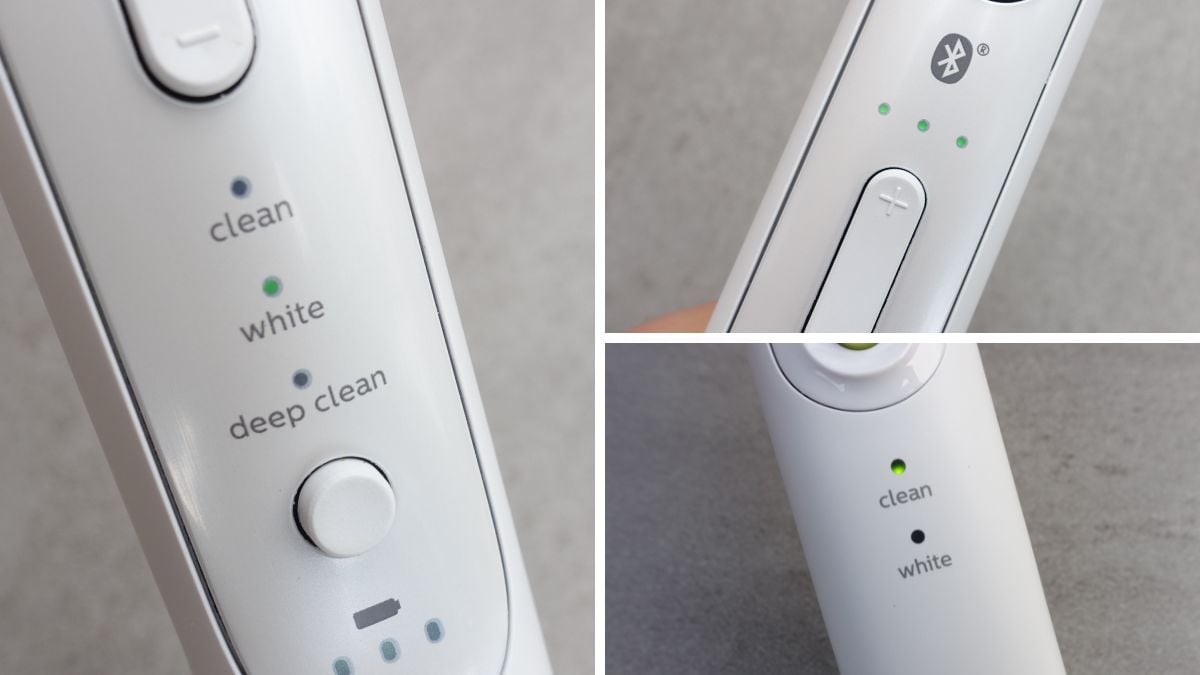
Physical Tour: Buttons, Lights, and Brush Head

The handle has a clean, minimal design. All control is through the single power/mode button and the visible icons on the front.
- Power/Mode button (upper front): Press to turn the toothbrush on. While on, press repeatedly to cycle through the three modes (the mode icon lights up). To turn off, press again or simply finish the two‑minute brushing cycle, after which the toothbrush will stop automatically.
- Brushing mode icons (above the button): Three icons, from top to bottom: Clean (single tooth), White+ (tooth with sparkles), Gum Health (tooth with a gumline).
- Intensity indicator (below the mode icons): Three small LEDs labelled “Low,” “Medium,” “High.” The default is Medium. You can change the intensity by pressing and holding the mode button for 2 seconds while the toothbrush is on.
- Pressure sensor light (ring at the bottom of the handle, near the brush head): This glows purple when you’re pressing too hard. It’s a visible and tactile reminder to ease up.
- Battery indicator (very bottom of the handle): A single LED that blinks amber when the battery is low (below 10%), and stays solid green when charging. No percentage readout; the BrushSync system also reminds you when to replace the brush head.
First‑Time Setup and Charging
- Charge the toothbrush for 24 hours before first use. This fully conditions the lithium‑ion battery. Plug the USB‑A cable into a 5V/1A USB adapter (like your phone charger). Place the handle on the charging base. The battery light blinks green when charging. When fully charged, the light stops blinking and stays solid green.
- Attach the brush head: Align the brush head so the bristles face the same direction as the front of the handle. Press the head firmly onto the metal shaft until there’s a tiny gap (about 1 mm) between the head and the handle. This gap is intentional; it allows the head to vibrate correctly.
- Wet the brush head, apply toothpaste, and you’re ready.
Understanding the Three Brushing Modes
The ProtectiveClean 6100 is a step up from basic sonic toothbrushes because it offers three distinct cleaning modes, each with its own timing and sonic pulse pattern.
Clean Mode (default, 2 minutes)
- The standard mode for everyday cleaning.
- The timer divides the mouth into four quadrants (30 seconds each) using a brief pause in vibration to tell you when to move to the next section. After 2 minutes, the toothbrush automatically stops.
- Uses the full 62,000 brush movements per minute at your chosen intensity.
White+ Mode (2 minutes 30 seconds)
- For removing surface stains and polishing teeth.
- Same quad pacer as Clean mode, but after the 2‑minute cleaning cycle, it continues for an additional 30 seconds of polishing on the visible front teeth. During this time, the sonic vibrations change slightly (you’ll feel a different pulse).
- Use this mode 2–3 times a week, not every day, to avoid over‑polishing.
Gum Health Mode (3 minutes)
- For stimulating and massaging gums.
- The timer still uses 30‑second intervals, but the total brushing time is 3 minutes. The handle vibrates at a slightly lower frequency and includes intermittent pulses to massage gum tissue.
- Use this mode if you have sensitive gums or are prone to gum recession.
How to switch modes: After turning the toothbrush on, press the mode button to cycle through the icons. The selected mode icon lights up. The toothbrush remembers the last mode you used and will start in that mode next time.
Intensity Settings and Personalization
You can adjust the power of the sonic vibrations to match your comfort level.
- While the toothbrush is on, press and hold the mode button for about 2 seconds. The three intensity LEDs (Low, Medium, High) will blink.
- Press the mode button again to toggle between Low, Medium, and High. Once you select one, wait 2 seconds, and the toothbrush will return to brushing mode with that intensity saved.
- The toothbrush remembers your intensity setting for each mode separately. For example, you can set Clean to High and Gum Health to Low.
- If you ever want to reset to factory defaults, see the reset section.
BrushSync Technology Explained
The ProtectiveClean 6100 uses BrushSync to track brush head wear and remind you when to replace it.
- The W2 Optimal White brush head (included) has a microchip that communicates with the handle.
- When you attach a new brush head, the handle automatically resets the replacement reminder.
- After about 3 months of normal use (2 sessions per day, 2 minutes each), the brush head replacement reminder will activate: the battery light at the bottom of the handle will blink amber, and you’ll hear a series of beeps after brushing.
- To dismiss the reminder, simply replace the brush head with a new one. The handle will detect the new chip and reset the timer.
- If you replace the brush head early, you can manually reset the reminder by pressing and holding the mode button for 3 seconds while the toothbrush is off. The battery light will blink green twice to confirm.
Note: The BrushSync feature works only with genuine Philips Sonicare brush heads that have the microchip. Third‑party or older Philips heads without the chip won’t trigger the reminder.
Pressure Sensor and Safe Brushing
One of the most important features is the pressure sensor.
- When you press the brush head too hard against your teeth and gums, the handle vibrates slightly differently, and a purple light glows at the base of the handle (near the brush head). This is your signal to lighten your grip.
- The pressure sensor is active in all modes and at all intensities.
- Over‑brushing can cause gum recession and enamel wear, so this feature is there to protect your mouth, not just the toothbrush.
Battery Life, Charging, and Care
- Full charge: Up to 2 weeks of regular use (2 sessions per day, 2 minutes each) when the handle is fully charged.
- Low battery: The battery light blinks amber when below 10%. You have about 3–4 brushing sessions left before it dies.
- Charging: Place the handle on the charging base. The green light blinks while charging and stays solid when full. Charging from empty takes about 12–15 hours.
- Battery care: For the longest battery life, recharge when the battery is low, not after every use. Do not leave the handle on the charger continuously for weeks; the charger will trickle‑charge, which is safe but can slightly reduce long‑term battery health. Every few months, run the battery completely down and then fully charge it.
- Storage: If you won’t use the toothbrush for a month or more, charge it to about 50%, turn it off, and store it in a cool, dry place.
Cleaning the Toothbrush and Charger
- Handle: Rinse the handle after each use and wipe with a damp cloth. Do not submerge the handle in water.
- Brush head: Rinse thoroughly after each use. Remove the brush head from the handle weekly and rinse the metal shaft and the inside of the brush head where toothpaste residue builds up.
- Charger: Unplug before cleaning. Wipe with a dry or slightly damp cloth. Ensure the charging contacts are clean; oxidation there can prevent charging.
Troubleshooting Common Problems
How to Reset the Toothbrush
The ProtectiveClean 6100 doesn’t have a full factory reset button, but you can reset specific features:
- Reset the BrushSync reminder: Hold the mode button for 3 seconds while the toothbrush is off. The battery light blinks green twice.
- Reset intensity settings to default (Medium): Turn the toothbrush on, press and hold the mode button for 2 seconds to enter intensity selection, then press the button until “Medium” is highlighted, and wait 2 seconds. Do this for each mode.
- Hard reset (power cycle): If the handle is frozen or unresponsive, place it on the charger for 10 seconds, then remove it. This often restarts the internal electronics.
Quick Reference Card
Download the Sonicare ProtectiveClean 6100 Cheat Sheet
A one‑page PDF with brushing modes, intensity settings, BrushSync tips, and troubleshooting. Print it and keep it in your bathroom drawer.
“Philips Sonicare 6100 Quick Guide (PDF)”
Official Philips Support and Manuals
For warranty, replacement brush heads, and the official PDF manual, visit: https://www.philips.com/support
FAQs
- Can I use other Philips Sonicare brush heads with this model?
Yes, all Philips Sonicare snap‑on brush heads fit the ProtectiveClean 6100. However, only heads with the BrushSync chip (like the W2 Optimal White, G2 Optimal Gum Care, C3 Premium Plaque Control) will activate the replacement reminder.
- Is the toothbrush waterproof?
The handle is water‑resistant and can be used in the shower, but it should never be submerged in water for extended periods. The charging base is not waterproof.
- Can I travel with it?
Yes. The travel case holds the handle and two brush heads. The battery lasts up to 2 weeks, so you don’t need the charger for most trips. The case is not waterproof; dry the handle and heads before storing.
- Why does the toothbrush automatically stop after 2 minutes?
That’s the built‑in timer. It’s designed to help you brush for the dentist‑recommended time. You can restart it if you want to continue brushing, but the cycle is meant to be enough.
- What should I do if the purple pressure light stays on even when I’m not brushing?
Remove the brush head and clean the metal shaft. If the light persists, the sensor may be stuck. Place the handle on the charger for a moment; this sometimes resets the sensor.
- Can I leave the toothbrush on the charger all the time?
It’s safe, but it may slightly reduce the battery’s lifespan over years. For best battery health, charge when the low‑battery indicator appears, and unplug when full.
A Brief Thought on Daily Use
The ProtectiveClean 6100 is built to gently improve your gum health and whiten teeth, but the real magic is consistency. The quad pacer and auto‑shutoff make it easy to brush for the full two minutes without watching a clock. Replace the brush head every three months (the BrushSync reminder will prompt you), and clean the metal shaft weekly to prevent toothpaste buildup from damping the vibrations. With minimal care, this toothbrush will serve you faithfully for years.
Copyright Warning!
Copyright 2026 productsmanuals.com All rights reserved. This Philips Sonicare ProtectiveClean 6100 HX6877 manual is original content and may not be copied, republished, or redistributed without written permission. Philips, Sonicare, BrushSync, and the Philips logo are trademarks of Koninklijke Philips N.V. This guide is unofficial and not affiliated with Philips.

