Roborock S8 MaxV Ultra Manual The Complete Guide to Setup Mapping and Maintenance
Introduction
The Roborock S8 MaxV Ultra is one of the most advanced robot vacuums you can buy. It vacuums, mops, washes its own mop, empties its own dustbin, and uses cameras and lasers to navigate. But the box contains only a quick‑start diagram and a safety booklet. There’s no real printed manual, so every day thousands of owners search “Roborock S8 MaxV Ultra manual” looking for genuine guidance: how to map the house correctly, what all the dock lights mean, how to stop the robot from eating cables, and how to clean the sensors when the robot starts acting lost.
This Roborock S8 MaxV Ultra manual is the friendly, detailed guide that should have been in the box. I’ve lived with this robot for months, mapped multiple floors, dealt with tangled brushes, and figured out every app setting. You’ll learn how to set it up without headaches, create a perfect map, maintain the dock and brushes, and solve the most common errors before they ruin your day. Bookmark this page — the next time the robot says “Error 8” or the mop stops spraying, you’ll have the answer right here.
What You’ll Find Inside the Box
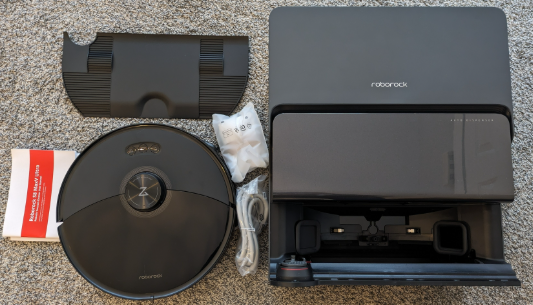
Your Roborock S8 MaxV Ultra box includes:
- Robot vacuum (with main brush, side brush, and two mop pads pre‑installed)
- Rock Dock Ultra docking station (auto‑empty, mop washing, water refill)
- Power cord (region‑specific)
- Dock ramp (for the robot to climb onto the dock)
- Extra dust bag (1‑2 spares)
- Cleaning solution (small sample bottle)
- Quick Start Guide and Safety Information
No separate remote control is included; everything runs through the Roborock app on your phone.
Finding the Perfect Spot for the Dock
Placement of the dock is critical, and getting it wrong causes half of all setup problems.
Clearance requirements
Place the dock on a hard, level floor. Leave at least 0.5 metres of open space on each side, and 1.5 metres in front. Remove any objects within 1 metre of the front that could block the robot’s return. If the dock is squeezed between furniture, the robot will consistently fail to dock.
Avoid direct sunlight
Sunlight hitting the dock’s laser sensors can blind the robot. Choose a shaded area.
No mirrors or reflective surfaces nearby
The LiDAR laser can bounce off mirrors, confusing the map. If you have large mirrors near the floor, cover the bottom edge or reposition the dock.
Cable management
Tuck the power cord behind the dock. Use the built‑in cord wrap to prevent loose loops that the robot could drag.
Powering On and Connecting to the App
- Plug the dock into the wall outlet. The dock’s LED ring will glow white.
- Place the robot on the dock by aligning its charging contacts. It will wake up and announce “Charging.”
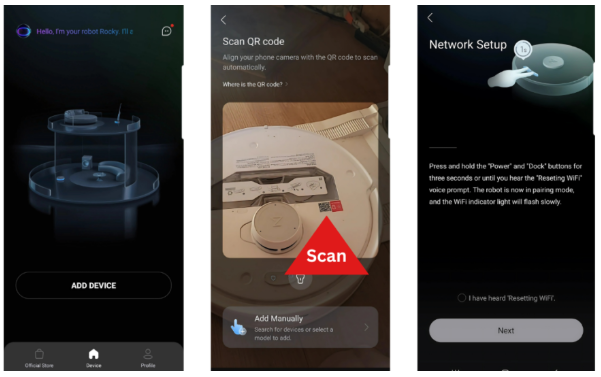
- Download the Roborock app (available on iOS and Android). Create an account or sign in.
- Tap “+” to add a device. The app detects the robot via Bluetooth. Select your Wi‑Fi network and enter the password. The robot only supports 2.4 GHz Wi‑Fi, not 5 GHz. If your router combines both bands, temporarily disable 5 GHz during setup.
- After connection, the robot will check for firmware updates. Install them immediately — new maps and obstacle avoidance algorithms improve with every update.
Creating Your First Map the Right Way
Mapping is the foundation of everything. A rushed first map leads to constant cleaning failures.
Prepare your home before mapping
- Pick up cables, socks, pet toys, and anything lightweight the robot could drag.
- Open all interior doors so the robot can access every room you want cleaned.
- Place virtual barriers (in the app, not physical) only after the first map is complete.
Start a full‑home mapping run
In the Roborock app, tap “Enter” on the main screen, then “Map.” Select “Create New Map.” Choose “Fast Mapping” — the robot will zip through the house without vacuuming, building the floorplan in about 10‑20 minutes.
Let the map complete without interruption
Do not move the robot or the dock during mapping. If the robot gets stuck, free it and let it continue; the app will prompt you to resume.
After mapping finishes
The map will appear in the app. The robot automatically divides it into rooms. You can merge, split, or rename rooms by tapping “Edit Map.” This is also the moment to place no‑go zones for thick rugs, pet bowls, and known cable nests.
Vacuum and Mop Settings That Match Your Home
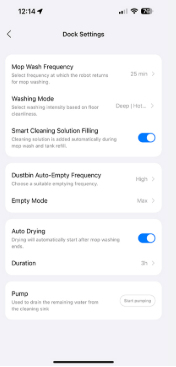
Suction power
- Quiet: For light daily maintenance. Very silent.
- Balanced: Default, suitable for hard floors and low‑pile carpets.
- Turbo: For deeper cleaning on carpets.
- Max: Maximum suction. Use when you really need everything picked up. Drains battery faster.
Mop intensity
- Low: Light dampness, perfect for sealed hardwood or laminate.
- Medium: Daily mopping on tile.
- High: Sticky spills and kitchen floors. The dock will automatically re‑wet and wash the mop pads during cleaning.
Vacuum‑and‑mop order
You can choose “Vacuum then Mop” (robot vacuums all rooms first, then returns to mop) or “Simultaneous” (vacuum and mop in the same pass). For the best finish, use the sequential mode; it prevents wet debris from sticking.
Carpet detection
The robot automatically lifts its mop pads when it detects carpet. You can set it to “Avoid carpet” (skips carpet entirely during mopping), “Auto‑lift” (recommended), or “Ignore” (mops over carpet, which you probably don’t want).
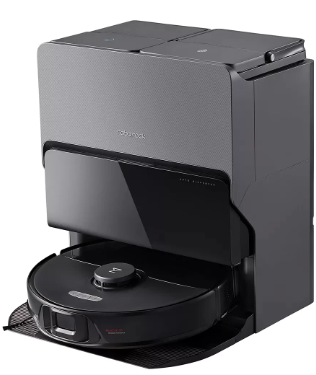
The Rock Dock Ultra: Emptying, Washing, and Refilling
The dock is what sets this robot apart from simpler models. Understanding its lights and maintenance prevents odours and malfunctions.
Dock LED indicators
- White pulsing: Cleaning or self‑maintenance in progress.
- White solid: Idle, ready.
- Red: Error (check the app for details — common causes are a full dirty water tank, empty clean water tank, or dust bag full).
- Blue: Robot is returning to dock or washing mop.
Emptying the dust bag
The dock automatically empties the robot’s dustbin after each cleaning. The sealed bag holds about 7 weeks of debris. When the app says “Dust bag full,” pull the tab on the top of the bag to seal it, then lift it out and replace with a new one. Do not reuse bags — the seal prevents dust from escaping.
Filling and emptying water tanks
- Clean water tank (top): Lift the lid, pull out the tank, and fill with fresh water. Optionally add the Roborock cleaning solution at the recommended ratio.
- Dirty water tank (bottom): Pull out and empty after each mopping session. Rinse it with clean water to prevent odour. Never let dirty water sit for days.
Mop washing
The dock scrubs the mop pads with a rotating brush and clean water during the cleaning cycle. You can set the washing frequency in the app (every 10, 15, or 20 minutes). More frequent washing uses more clean water but keeps floors streak‑free.
Routine Maintenance That Prevents Costly Repairs
Regular maintenance takes five minutes and doubles the robot’s lifespan.
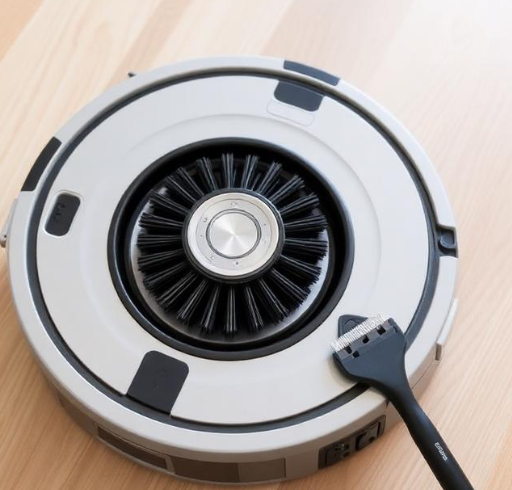
Clean the main brush every two weeks
Press the release tabs on the brush cover and lift out the brush. Remove hair wrapped around the ends. Use the included cleaning tool to cut through tangled strands along the brush groove. Wipe the brush compartment with a dry cloth.
Check the side brush monthly
The side brush is held by a single screw. Unscrew it, remove the brush, and clean any hair from the base. Replace the brush if the bristles are bent out of shape.
Wipe the sensors
The robot relies on LiDAR (the spinning top dome), front camera, and cliff sensors on the bottom. Wipe all of them gently with a soft, dry micro fiber cloth. Dirty sensors cause the robot to map incorrectly, bump into walls, or refuse to cross dark‑coloured rugs.
Clean the dock
Wipe the dock tray where the mop pads sit. Remove the red plug in the bottom of the dock base periodically and flush out debris. Check the filter in the dirty water tank and rinse it under running water if it looks clogged.
Replace the dust bag filter (if fitted)
Some models include a washable pre‑filter in the dock’s air outlet. Check the app’s maintenance section for the exact lifespan; rinse and dry it completely before reinstalling.
Solving the Most Common Errors
| Error | Meaning | Fix |
|---|---|---|
| Error 1 | LiDAR sensor stuck or blocked | Rotate the top turret by hand to check for obstruction. Wipe the sensor dome. Reboot the robot. |
| Error 2 | Side wheel stuck | Turn the robot over and spin each wheel. Remove hair wrapped around the axles. |
| Error 5 | Main brush jam | Remove the brush and cut away tangled hair. Check the brush cover is clicked back on. |
| Error 8 | Robot stuck or picked up | Move the robot to a clear area and restart the cleaning task. |
| Error 13 | Charging error | Wipe the charging contacts on the robot and dock with a dry cloth. Ensure the dock has power. |
| Error 23 | Dirty water tank full | Empty the dirty water tank and reinsert it firmly. |
| Robot won’t connect to Wi‑Fi | Network issue | Ensure you’re using a 2.4 GHz Wi‑Fi network. Restart the router and the robot. Re‑pair in the app. |
| Map rotated or shifted | Dock was moved | Delete the current map and re‑run a full mapping. Never move the dock after mapping. |
Hidden App Features That Improve Daily Use
Routine scheduling
In the app, go to “Schedule” and create a daily routine. You can set different suction and mopping levels for each room. For example: kitchen and dining area on Max suction and High mop, bedrooms on Balanced suction and Low mop, all at 10 AM.
Pin and go
Tap the map, select “Pin and Go,” and drop a pin anywhere. The robot will drive directly to that spot and clean a small area around it. Perfect for spilled cereal.
Remote control
In the app, tap “Remote Control.” You get on‑screen joystick buttons to manually steer the robot. This is useful for cleaning a very specific spot or guiding it out of a tight corner.
Do Not Disturb mode
Set a time window during which the robot won’t speak, beep, or auto‑resume. The dock light also dims. Enable it for overnight hours.
Child lock
In settings, turn on “Child Lock.” All physical buttons on the robot are disabled, preventing curious kids or pets from starting a clean or pausing the robot.
Restarting, Resetting, and Factory Defaults
Simple restart
Press and hold the Power button on top of the robot for about 5 seconds until the light ring turns off. Press it again to turn the robot back on. No settings are lost.
Factory reset from the robot
- Remove the robot from the dock.
- Press and hold the Home button (the house icon) and the Power button simultaneously for about 5 seconds.
- The light ring will flash, and a voice prompt will say “Restoring factory settings.”
- Release the buttons. The robot will reboot and be ready to pair as a new device.
Factory reset from the app
Go to Settings > General > Reset Device. Confirm. The map, schedules, and Wi‑Fi credentials will be erased.
Resetting the dock
Unplug the dock for 30 seconds, then plug it back in. The dock does not have a separate reset button; power cycling clears temporary glitches with water tanks or dust bag detection.
Battery Care and Long‑Term Storage
- Charge before first use: The robot arrives with a partial charge. Place it on the dock and let it charge fully before the first cleaning run.
- Avoid deep discharge: If you’re not using the robot for weeks, leave it on the dock with power. The battery management system prevents overcharging.
- Storage for months: Charge the robot to about 50%, turn it off (hold Power for 5 seconds), and store it in a cool, dry place. Recharge every 3 months to keep the battery healthy.
- Battery replacement: The battery is user‑replaceable. If runtime drops significantly, order an official replacement from Roborock. Remove the bottom cover screws, disconnect the old battery, and plug in the new one.
Quick Reference Card
| Action | How |
|---|---|
| Pause cleaning | Press any physical button on the robot |
| Return to dock | Press the Home button on the robot once |
| Start full clean | Press the Power button once |
| Force restart | Hold Power button 5 seconds |
| Factory reset | Hold Home + Power buttons together 5 seconds |
| Child lock on/off | App Settings > Child Lock |
| Pin and Go | App map > Pin and Go |
| Fast mapping | App > Map > Create New Map > Fast Mapping |
Download the Roborock S8 MaxV Ultra Cheat Sheet
A one‑page PDF with error codes, maintenance schedules, button combos, and mapping tips. Save it to your phone so you can quickly fix the robot when it starts beeping in the middle of dinner.
“Roborock S8 MaxV Ultra Quick Guide (PDF)”
Official Roborock Support Page
For warranty claims, firmware updates, and the official PDF manual, visit:
https://support.roborock.com
Before You Put This Guide Away
This manual was written to make your life with the S8 MaxV Ultra genuinely easier. I hope your floors now stay spotless, your maps remain accurate, and your robot never gets stuck under the sofa again. If a neighbor ever buys one of these robots and looks confused, send them this guide — it will save them a lot of frustration and maybe a spilled coffee mug.
Copyright Warning!
Copyright 2026 [Your Name or Site Name]. All rights reserved. This Roborock S8 MaxV Ultra manual is original content and may not be copied, republished, or redistributed without written permission. Roborock, S8 MaxV Ultra, and the Roborock logo are trademarks of Beijing Roborock Technology Co., Ltd. This guide is unofficial and not affiliated with Roborock.