Why This Companion Matters
Mitsubishi Electric ships the MSZ‑FS18NA with an installation manual for technicians and a brief operating leaflet. The full user manual is a dense PDF that covers dozens of models. There’s no friendly, plain‑language guide that explains how the wireless remote symbols work, when to clean the filters, what the blinking green light on the indoor unit means, or how to connect the Wi‑Fi adapter. Every day, homeowners search for a “Mitsubishi Electric MSZ‑FS18NA manual” hoping for straightforward answers.
This companion fills that gap. I’ve lived with this exact heat pump through freezing winters and humid summers. I’ve deciphered every remote icon, cleaned the plasma filter, reset the Wi‑Fi, and identified the beeps and blinking lights. Whether you’re holding the remote for the first time or troubleshooting a unit that won’t heat, you’ll find the fix here. Bookmark this page—the next time the error light flashes or the airflow feels weak, the solution is right here.
Understanding Your Indoor Unit and Its Indicators
The sleek white unit on your wall communicates through lights and a receiver window for the remote.
Operation indicator lamp
A steady green light means the unit is running normally. A slow blink indicates standby (waiting to restart after a power interruption). A rapid flash signals an error; the number of flashes corresponds to a fault code (covered later).
Timer light
A yellow light means the weekly timer or simple timer is active. If you didn’t set a timer and this light is on, press the “Timer” button on the remote to check.
Powerful and i‑see Sensor indicators
Some models have additional blue or orange indicators for the 3D i‑see Sensor and Powerful mode. These are normal and turn off when the mode is deactivated.
Mastering the Wireless Remote Controller
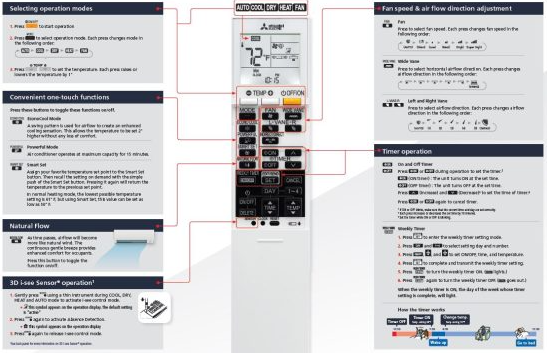
The remote is your command centre. Every button serves a practical purpose.
Mode selection
Press the “Mode” button to cycle through: Auto, Cool, Dry, Heat, and Fan. The display shows a sun for heat, a snowflake for cool, a teardrop for dry, and an A for auto. Auto mode decides between heating and cooling based on the room temperature.
Temperature adjustment
Use the up and down arrows under the display cover (slide the cover down). The set temperature appears on the remote screen. Note: the remote displays the target temperature, not the room temperature.
Fan speed and airflow direction
Press “Fan” to choose Auto, Quiet, Low, Medium, High, or Super High. Press “Vane” to adjust the horizontal louvre (airflow direction). Press and hold “Vane” to activate the Swing mode, which moves the louvre continuously.
Powerful and Econo Cool
“Powerful” boosts cooling or heating for 15 minutes at maximum fan speed. “Econo Cool” adjusts airflow direction slightly upward to avoid direct cold draughts, saving energy while keeping comfort.
Weekly timer
The MSZ‑FS18NA supports a 7‑day programmable timer. Press “Weekly” on the remote, then use the arrow buttons to set On and Off times for each day. The yellow timer light on the indoor unit confirms it’s active.
Resetting the remote
If the remote becomes unresponsive or the display is scrambled, remove the two AAA batteries, press and hold any button for 5 seconds to drain residual charge, then reinsert fresh batteries. The remote will reset to default settings.
Connecting the Wi‑Fi Adapter and Using the App
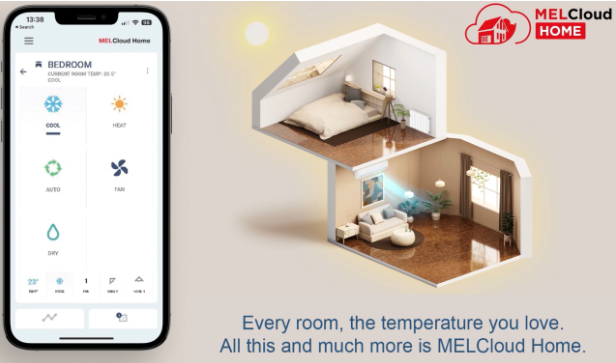
The MSZ‑FS18NA can be controlled remotely via the optional MAC‑558IF‑E Wi‑Fi adapter (or built‑in Wi‑Fi on newer revisions).
Installation and pairing
- Ensure the indoor unit is powered off at the breaker before installing the adapter. The adapter plugs into the CN105 connector on the indoor unit’s control board. If you’re not comfortable opening the unit, have a qualified technician install it.
- Once installed, restore power and download the MELCloud app on your phone.
- Open the app, create an account, and tap “Add Unit.” Choose “Wi‑Fi Adapter.”
- Follow the in‑app steps to connect the adapter to your home 2.4 GHz Wi‑Fi network. The adapter’s LED will flash quickly during pairing and stay solid when connected.
Features of MELCloud
- Turn the unit on/off remotely.
- Set temperature, mode, and fan speed.
- View room temperature and energy consumption.
- Create schedules and geofencing rules (e.g., turn on heat when you’re 5 km from home).
- Receive error notifications.
If Wi‑Fi disconnects
Power cycle the indoor unit at the breaker for 30 seconds. Restart the MELCloud app and check your Wi‑Fi password hasn’t changed. If the adapter LED is solid but the app shows offline, delete the unit in the app and re‑pair it.
Cleaning the Filters and the Plasma Quad Filter
The MSZ‑FS18NA has two types of filters that need regular attention. Clean them every two weeks during heavy use, or when the “Filter” indicator on the indoor unit lights up.
Standard air filter
- Open the front panel by pulling the bottom corners gently upward until it clicks into the open position.
- Slide the two rectangular filters out of their tracks.
- Vacuum the filters with a brush attachment, or wash them with lukewarm water and mild dish soap. Rinse thoroughly.
- Dry the filters completely in the shade—never in direct sunlight or a dryer.
- Slide them back into place and close the front panel. Press the “Filter Reset” button on the remote (press the small recessed button with a pen tip) to turn off the filter indicator.
Plasma Quad Plus filter (if equipped)
This is a smaller, dark‑coloured electrostatic filter that traps fine particles and allergens.
- Remove it from its holder behind the standard filters.
- Rinse gently with lukewarm water. Do not scrub or use detergent.
- Soak in lukewarm water for about 2 hours if it’s very dirty.
- Dry completely in the shade before reinstalling.
- Replace the Plasma Quad filter every year for optimal air purification.
Cleaning the i‑see Sensor lens
Wipe the small lens on the front of the indoor unit gently with a dry cotton swab. Dust on the lens can affect the 3D temperature sensing.
Understanding Error Codes and Troubleshooting

When something’s wrong, the green operation light blinks in a pattern. Count the flashes, then check the table below.
| Number of Flashes | Fault Description | What to Do |
|---|---|---|
| 1 | Indoor unit thermistor fault | Turn off the breaker for 2 minutes, then restart. If it returns, the sensor may need replacement. |
| 2 | Outdoor unit fault (compressor, power module) | Check the outdoor unit isn’t covered in snow or debris. Power cycle at the breaker. If persistent, call a technician. |
| 3 | Communication error between indoor and outdoor | Check the connecting cable for damage. Power cycle. If blinking continues, the indoor or outdoor control board may need service. |
| 4 | Float switch activated (drain problem) | The indoor unit’s drain pan may be clogged. Pour a cup of water mixed with a tablespoon of vinegar down the drain line. Call a technician if water still backs up. |
| 5 | Outdoor unit pipe temperature sensor fault | Power cycle the unit. If the error persists, the sensor may be faulty. |
| 6 | Refrigerant system fault | Turn off the unit and call a qualified technician. This could indicate a leak or a stuck valve. |
| 7 | Indoor fan motor fault | Check for obstructions around the fan behind the front panel. Power cycle. If the motor is silent or grinding, it may need replacement. |
| Continuous rapid flash | Power supply or board fault | Turn off the breaker immediately and contact a licensed electrician or Mitsubishi Electric service. |
The unit won’t turn on at all
- Check the circuit breaker for the indoor and outdoor units. The outdoor unit usually has its own disconnect switch.
- Ensure the remote has fresh batteries and is pointed at the receiver window.
- Verify the timer isn’t set to “Off.” Press “Timer” and cancel any active schedules.
Airflow is weak or not cold/warm
- Clean the filters. A clogged filter reduces airflow dramatically.
- In heating mode, the unit may periodically stop the fan to defrost the outdoor coil. This is normal and lasts up to 10 minutes. The operation light will blink slowly during defrost.
Seasonal Care and Long‑Term Storage
Before summer cooling season
- Clean both filters.
- Check that the outdoor unit’s coils are free of leaves, cottonwood fluff, and debris. Gently rinse with a garden hose if needed (turn the power off first).
- Test the unit in Cool mode for 10 minutes and check for cold air.
Before winter heating season
- Clean the filters again.
- Remove any snow, ice, or fallen branches from the outdoor unit. Ensure the airflow around it isn’t blocked.
- Run the unit in Heat mode and verify warm air comes through after a few minutes.
Off‑season storage
- Turn the unit off at the breaker if you won’t use it for months.
- Clean the filters one final time and leave the front panel slightly open to prevent moisture buildup.
- If the outdoor unit is in a harsh coastal environment, consider a protective cover that allows ventilation (do not fully seal it).
Quick Reference Card
| Action | How |
|---|---|
| Turn on/off | Press the On/Off button on the remote |
| Change mode | Press Mode until desired symbol appears |
| Adjust temperature | Slide remote cover down, press ▲ or ▼ |
| Activate Powerful mode | Press the Powerful button (runs 15 minutes) |
| Swing airflow | Press and hold Vane until louvre moves continuously |
| Reset filter indicator | Press Filter Reset (recessed button) with a pen tip |
| Reset remote | Remove batteries, press any button 5 seconds, reinsert batteries |
| Power cycle unit | Turn breaker off, wait 30 seconds, turn on |