
Why This Companion Was Created
iRobot ships the Roomba j7+ with a Quick Start card, a safety booklet, and a link to the iRobot Home app. There’s no printed manual that explains how Precision Version navigation works, what the error lights mean, how to clean the sensors after a messy run, or why the robot sometimes refuses to dock. Every day, thousands of owners search for an “iRobot Roomba j7+ manual” because they want clear, human‑friendly help.
This companion gives you that help. I’ve mapped a whole home with this exact robot, dealt with pet hair tangles, emptied the Clean Base dozens of times, and figured out every icon and beep. Whether you’re setting it up for the first time or troubleshooting a flashing red ring, you’ll find the fix here. Bookmark this page—the next time the robot stops mid‑clean or the app shows an unfamiliar code, the answer is right here.
What Comes in the Box (j7556 Bundle)
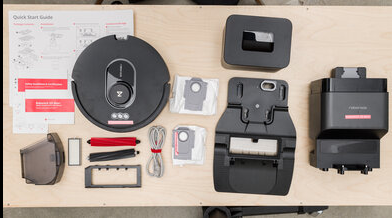
Your j7556 bundle includes:
- The Roomba j7+ robot vacuum
- The Clean Base Automatic Dirt Disposal (the charging and emptying dock)
- A power cord for the Clean Base
- One spare high‑efficiency filter
- One spare edge‑sweeping brush
- A Quick Start card and safety booklet
The robot’s battery comes partially charged. Place it on the Clean Base for at least 3 hours before the first cleaning run.
Setting Up the Clean Base and First‑Time Power‑On
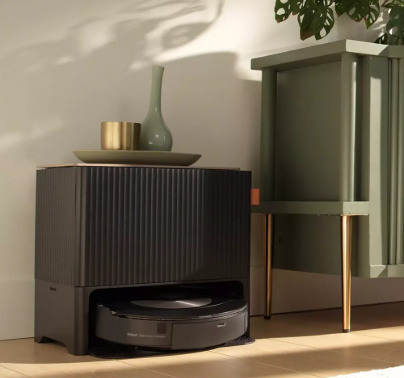
Position the Clean Base on a hard, level floor against a wall. Leave at least 1.5 feet of open space on each side and 4 feet in front. Plug the power cord into the base and into a wall outlet—not a power strip. Tuck excess cord into the channel on the back of the base.
Place the robot on the base by aligning its metal charging contacts with the base’s pads. A chime will sound and the light ring on the robot will pulse white while charging. When the ring turns solid white, the battery is full.
Connecting to the iRobot Home App and Wi‑Fi
- Download the iRobot Home app on your phone (iOS or Android).
- Open the app, create an account or sign in, and tap “Add a Robot.”
- Select “Roomba j7+.” The app will instruct you to press and hold the Spot Clean and Home buttons on the robot simultaneously for 3 seconds until it chimes and the light ring flashes blue.
- The robot will broadcast a temporary Wi‑Fi network. Connect your phone to this network when prompted, then return to the app and select your home 2.4 GHz Wi‑Fi network.
- Once connected, the robot will download the latest firmware. Keep it on the base until the update finishes.
Troubleshooting Wi‑Fi
The j7+ only supports 2.4 GHz Wi‑Fi. If your router combines 5 GHz and 2.4 GHz under one name, temporarily disable the 5 GHz band during setup, or create a separate 2.4 GHz guest network.
Smart Mapping and Creating Your First Map
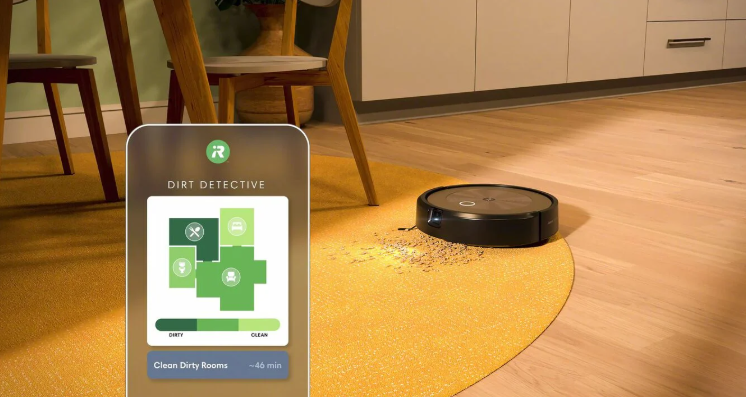
The j7+ uses a camera‑based navigation system called Precision Vision. During the first few runs, it builds a map of your home.
How to create the first map
- In the app, select “Clean Everywhere.” The robot will wander the entire accessible floor, using its camera to identify walls and furniture.
- Do not move the robot or the Clean Base during mapping. Keep doors open that you want included.
- It may take 2–3 full cleaning cycles for the map to complete. Once done, the app will notify you that a Smart Map is ready.
Customizing the map
- Name each room (Kitchen, Living Room, etc.).
- Set “Clean Zones” for high‑traffic areas (e.g., around the dining table).
- Create “Keep Out Zones” for areas with cables, pet bowls, or delicate rugs. The camera will recognize and avoid them.
Editing Keep Out Zones
Open the map in the app, tap “Keep Out Zone,” draw a rectangle over the area, and save. The robot will never enter that space again unless you remove the zone.
Understanding the Robot’s Lights, Sounds, and Buttons
Light ring (on the Clean button)
- Solid white: Charged and ready.
- Pulsing white: Charging.
- Pulsing blue: In pairing mode.
- Pulsing green: Cleaning or charging with a good battery level.
- Red ring (solid or sweeping): Error—check the app for details.
- Red ring with a flashing icon: Low battery (the robot will return to base automatically).
Buttons
- Clean (large centre button): Press once to start or pause a cleaning job. Press and hold for 3 seconds to turn the robot off.
- Home (button with a house icon): Press once to send the robot back to the Clean Base. Press and hold for 10 seconds to factory reset the robot (when removing from your account).
- Spot Clean (button with a target icon): Press to clean a small area around the robot. The robot spirals outward about 3 feet and then returns.
Reset button
A tiny recessed button under the light ring. Use a paperclip to press it if the robot is frozen and won’t respond to the Clean button. Press and hold for 10 seconds, then release. The robot will reboot.
Maintenance and Cleaning the Robot

Regular maintenance keeps the j7+ performing at its best.
Empty the bin (every few days)
- Press the bin release button on the side of the robot and slide the bin out.
- Open the bin door over a trash can and shake out debris.
- Wipe the bin interior with a dry cloth.
Clean the filter (weekly)
- Pull the filter out of the bin. Tap it against the trash can to remove loose dust.
- Rinse the filter under lukewarm water. Do not use soap.
- Shake off excess water and let it dry for at least 24 hours before reinstalling. The j7+ comes with one spare filter so you can swap while one dries.
Clean the edge‑sweeping brush (monthly)
The small spinning brush on the corner of the robot can accumulate hair. Pull it off (it snaps on and off), remove tangled hair with a pair of scissors, and rinse the brush in warm water if needed. Let it dry before snapping it back.
Clean the front caster wheel (monthly)
Pull the front wheel out firmly. Remove any hair wrapped around the axle. Push the wheel back in until it clicks.
Clean the sensors and camera (weekly)
Wipe the camera lens (on top of the robot) and the four cliff sensors (on the underside) with a soft, dry cloth. Dust and smudges can cause navigation errors.
Clean the charging contacts (monthly)
Use a dry melamine foam sponge (magic eraser) or a soft cloth to gently buff the metal contacts on the robot and the Clean Base. Do not use water or cleaners.
Emptying the Clean Base and Replacing the Bag
The Clean Base automatically empties the robot’s bin after each run (a loud whoosh sound is normal). When the red light on the base lights up or the app says the bag is full, replace the bag.
- Open the lid of the Clean Base.
- Pull up on the card stock tab to seal the bag, then lift the bag out and dispose of it.
- Slide a new, genuine iRobot Clean Base bag into the slot until it clicks.
- Close the lid. The bag is self‑sealing and holds about 60 days of debris.
If the base is not emptying the robot
- Check that the bag is not full and is seated correctly.
- Wipe the metal contacts on the robot and base.
- Ensure the robot’s bin is not jammed with large debris; empty it manually if needed.
Troubleshooting and Error Codes
[Image Placeholder 5: The Roomba j7+ with a red light ring, next to a smartphone showing the error message in the app. Alt text: “iRobot Roomba j7+ error alert”]
| Light / Alert | Meaning | What to Do |
|---|---|---|
| Red ring, one beep | Robot stuck or wheel drop | Place the robot on a flat surface. Check for a drop‑off. Move the robot to a new location and press Clean. |
| Red ring, two beeps | Main brushes cannot turn | Turn the robot over, remove the brush frame, and pull out the two brush rollers. Remove hair and debris from the bearings and axles. Reinstall. |
| Red ring, three beeps | Side brush stuck | Clean the edge‑sweeping brush of hair and debris. Ensure the brush spins freely by hand. |
| Red ring, four beeps | Wheel motor overload | Push each large wheel up and down a few times to ensure it moves freely. Clean any debris around the wheels. |
| Red ring, five beeps | Front wheel stuck | Remove the front caster wheel, clean the axle, and reinstall. |
| Red ring, eight beeps | Battery communication error | Remove the robot from the base, press and hold Clean for 20 seconds, then place it back on the base. If the error persists, the battery may need replacement. |
| Red ring, fourteen beeps | Bin missing or filter not seated | Slide the bin in firmly until it clicks. Ensure the filter is installed correctly in the bin. |
| App error “Robot not on base” | Alignment or dirty contacts | Wipe the charging contacts on the robot and base. Place the robot directly onto the base, adjusting its position until the white charging light appears. |
Factory reset from the robot
Hold the Home and Spot Clean buttons together for 10 seconds. The robot will chime and the light ring will flash. Release. This clears the Wi‑Fi and all maps. The robot will need to be re‑paired to the app.
Factory reset from the app
Go to the iRobot Home app, select your robot, tap the gear icon, scroll down to “Remove/Factory Reset,” and confirm. This removes the robot from your account and erases maps.
Power cycle the robot
If the robot is frozen, turn it off by holding Clean for 3 seconds, then place it on the base for 30 seconds, then press Clean to wake it.
Quick Reference Card
| Action | How |
|---|---|
| Start a full clean | Press the Clean button once |
| Pause / Resume | Press Clean while running |
| Send to base | Press the Home button |
| Spot clean | Press the Spot Clean button |
| Turn off robot | Hold Clean for 3 seconds |
| Factory reset (from robot) | Hold Home + Spot Clean for 10 seconds |
| Enter Wi‑Fi pairing | Hold Spot Clean + Home for 3 seconds |
| Check error details | Open the iRobot Home app and tap the alert |