HP ships the OfficeJet Pro 9015e with a setup poster, a warranty card, and a link to an online manual that covers dozens of models. There’s no printed guide that clearly explains how to connect it to your Wi‑Fi when the auto‑setup fails, how to scan a stack of documents to email, what the blinking lights mean, or how to replace ink without making a mess. Every day, thousands of owners search for an “HP OfficeJet Pro 9015e manual” looking for straightforward, human‑friendly help.
This companion fills that gap. I’ve set up this exact printer in a home office, connected it to Wi‑Fi, scanned double‑sided pages, replaced ink cartridges, and deciphered every blinking icon on the touchscreen. Whether you’re unpacking it for the first time or trying to clear a stubborn error, you’ll find the fix here. Bookmark this page—the next time the printer says “offline,” a cartridge won’t read, or a paper jam won’t clear, the answer is right here.
Unboxing and Preparing the Printer

Your box contains:
- The HP OfficeJet Pro 9015e printer (with a protective tape and film)
- Four setup ink cartridges (black, cyan, magenta, yellow) sealed in a box
- A power cord
- A setup poster and warranty card
- No USB cable is included; HP expects you to set it up wirelessly.
Remove all blue tape, cardboard spacers, and the plastic film from the scanner lid and control panel. Open the ink access door and remove the protective plastic from the printhead area.
Installing the Ink Cartridges
- Open the front ink access door. The carriage will move to the center.
- Remove each cartridge from its packaging. Pull the orange pull tab to remove the protective film, but do not touch the copper contacts or the ink nozzle.
- Insert each cartridge into its colour‑coded slot. Press down until it clicks. The color order from left to right is: Black, Cyan, Magenta, Yellow.
- Close the ink access door. The printer will prime the ink system. This takes a few minutes and the printer may make a whirring sound. Do not turn off the printer during this process.
Powering On and Initial Setup on the Touchscreen
Plug the power cord into the back of the printer and into a wall outlet. Press the power button on the front panel. The touchscreen will light up and guide you through:
- Language and region
- Date and time
- Load paper: Pull out the main paper tray (tray 1). Slide the paper width guides outward, load a stack of plain paper, adjust the guides, and push the tray back in. The printer will automatically align the printhead by printing a test page.
Connecting to Wi‑Fi Wirelessly
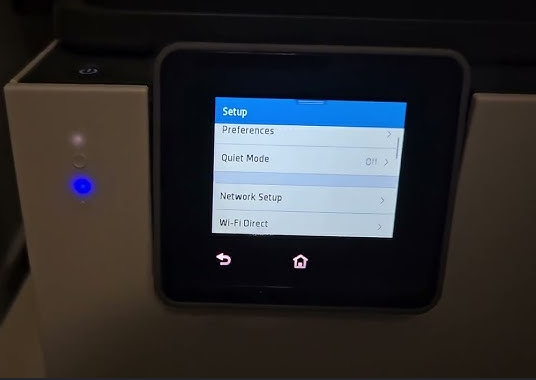
Standard Wi‑Fi Setup
- On the touchscreen, tap “Set Up Wi‑Fi” or go to Settings > Network > Wireless.
- Choose your home Wi‑Fi network from the list, tap it, and enter the password using the on‑screen keyboard.
- The printer will connect and display “Connected.” The blue wireless light on the front panel will stay solid.
HP Smart App Setup (Recommended)
- On your computer or phone, download the HP Smart app from HP’s website or your app store.
- Open the app and tap “Add a Printer.” It will detect the 9015e if it’s in setup mode.
- Follow the in‑app instructions to connect the printer to your Wi‑Fi. This method also links the printer to your HP account, enabling Instant Ink if you subscribe.
Wi‑Fi Direct and No‑Router Printing
- Wi‑Fi Direct: On the printer, go to Settings > Network > Wi‑Fi Direct. Turn it on. The printer creates its own network (e.g., DIRECT‑90‑HP OfficeJet Pro 9015e). Connect your phone or laptop to this network, then print directly without a router.
- USB connection: The 9015e has a rear USB host port, but HP does not support a direct USB‑to‑computer connection for this model. Use Wi‑Fi or Ethernet (the Ethernet port is on the back, covered by a dust cap).
If Wi‑Fi fails repeatedly
- Restart your router and the printer.
- Move the printer closer to the router during setup.
- Temporarily disable 5 GHz on your router; the printer connects at 2.4 GHz only.
- Use the “Restore Network Defaults” option in Settings > Network to wipe old credentials and try again.
Scanning, Copying, and Faxing Essentials
Scanning to a computer or email
- Place your document face‑down on the scanner glass or face‑up in the automatic document feeder (ADF) on top.
- On the home screen, tap “Scan.”
- Choose a destination: “Computer” (if installed with HP Smart), “Email,” or “USB drive” (insert a USB drive into the rear port).
- Adjust settings: file type (PDF, JPEG), color, resolution. Tap “Scan.” The ADF can hold up to 35 sheets and will scan both sides in a single pass if you select “Two‑Sided.”
Copying
- Place the original on the glass or in the ADF.
- Tap “Copy.” Use the touchscreen to set the number of copies, color, reduce/enlarge, and two‑sided copying.
- Tap the large “Start” button (or the dedicated black or color copy buttons on the panel).
Faxing (if needed)
The 9015e has a fax port on the rear. Connect a phone line. On the home screen, tap “Fax.” Enter the number using the keypad, load the document in the ADF, and tap “Start.”
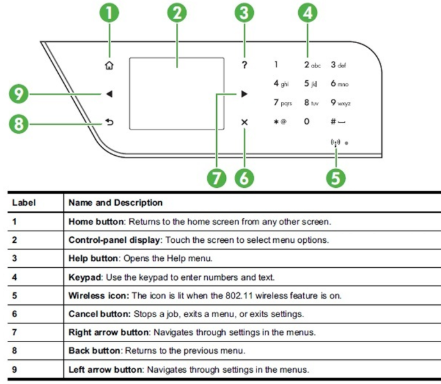
Understanding the Display, Icons, and Control Panel
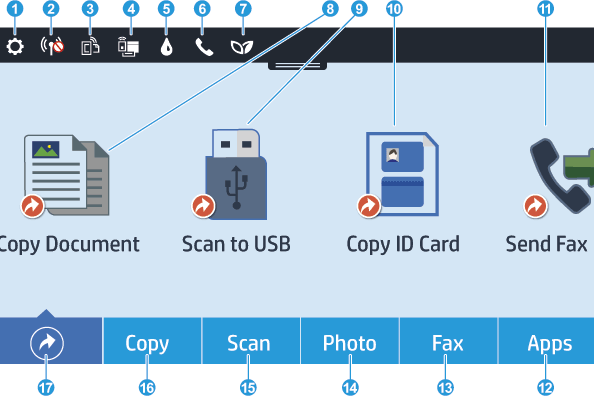
The 2.7‑inch color touchscreen shows large, easy‑to‑press tiles.
Key icons
- Dashboard tile: Returns you to the home screen from any menu.
- Ink tile: Shows estimated ink levels. A yellow exclamation mark means a cartridge is low.
- Wireless icon (blue): Solid when connected to Wi‑Fi; blinking when trying to connect; off when no connection.
- Error icon: A triangle with an exclamation mark. Tap it to see a description of the problem.
Sleep and Auto‑Off
The printer enters sleep after a period of inactivity. Tap the screen or press the power button to wake it. The printer will automatically wake from sleep when a print job is sent.
Replacing Ink Cartridges and Maintaining Print Quality
When to replace
- The printer will display a “Low on Ink” or “Cartridge Problem” message.
- Print quality declines: streaks, missing colors, or faint text.
Replacement steps
- Open the front ink access door. The carriage moves to the center.
- Push down on the old cartridge to release it, then pull it out.
- Remove the new cartridge from its packaging. Do not touch the copper contacts. Pull the orange tab to remove the film, then insert the cartridge into its slot and push until it clicks.
- Close the door. The printer will align the printhead automatically. You may hear whirring for a minute.
Using HP Instant Ink
The 9015e is designed for HP’s Instant Ink subscription. If enrolled, replacement cartridges are shipped automatically when the printer detects low ink. If you’re not enrolled and see a prompt, you can ignore it and continue using the ink you purchased.
Printhead cleaning
If prints are streaky after new cartridges, go to Settings > Tools > Clean Printhead. The printer will run a cleaning cycle and print a test page. Repeat up to two more times if quality doesn’t improve.
Error Codes, Blinking Lights, and Troubleshooting
| Issue / Code | Meaning | What to Do |
|---|---|---|
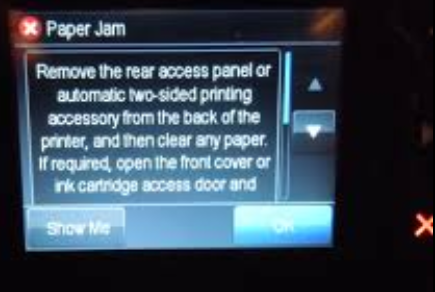
| Paper Jam | Paper stuck in the path. | Remove the main paper tray and look inside the paper path. Open the ink access door and remove any visible paper. Gently pull jammed paper in the direction of the paper path—never against it. Remove the rear cleanout door (if equipped) to access jammed paper from the back. Check the ADF; if paper is jammed there, open the ADF cover and carefully pull it out. |
| Carriage Jam | The ink carriage is blocked. | Open the ink access door. Ensure nothing is blocking the carriage from moving. Remove any loose paper or foreign objects. Close the door; the carriage should reset. |
| Error Code 0XB8A3B58 (or similar long string) | Often a software/printhead failure. | Power cycle the printer: unplug the power cord from the back of the printer and the wall, wait 60 seconds, then reconnect. If the error returns, run a Hard Reset: with the printer on, unplug power, wait 60 seconds, plug back in while holding the power button for 30 seconds, then release. |
| Offline / Printer Not Found | Connection issue. | Check the blue wireless light is solid. Restart your router and printer. On your computer, go to HP Smart and re‑add the printer. If using Wi‑Fi, ensure the printer is on the same network as your device. |
| Ink Cartridge Problem | Cartridge not detected or incompatible. | Remove and re‑insert the cartridge firmly. Clean the copper contacts on the cartridge with a lint‑free cloth lightly moistened with water. If the problem persists, the cartridge may be defective. |
| ADF Jam | Paper stuck in the automatic document feeder. | Open the ADF cover, gently remove any paper, and check the ADF rollers for debris. Close the cover. The printer will reset the feed mechanism. |
| Print Quality Issues | Clogged printhead or low ink. | Run the “Clean Printhead” utility from Settings > Tools. Check ink levels. If cleaning doesn’t help, try aligning the printhead (Settings > Tools > Align Printer). |
How to Factory Reset and Restore Network Settings
Soft reset (restart)
Press the power button to turn off the printer. Wait 30 seconds, then press it again. This often clears temporary glitches without losing settings.
Restore Network Defaults
Go to Settings > Network > Restore Network Defaults. This erases Wi‑Fi passwords and returns wireless settings to factory state. You’ll need to reconnect the printer to your Wi‑Fi afterward.
Full Factory Reset
Go to Settings > Printer Maintenance > Restore > Restore Factory Defaults. Confirm by tapping “Continue.” This wipes all custom settings, network info, and returns the printer to out‑of‑the‑box state. Use this as a last resort or before giving away the printer.
Quick Reference Card
| Task | How to Access |
|---|---|
| Print a wireless test report | Settings > Reports > Wireless Test Report |
| Print a page (from computer) | File > Print, select HP OfficeJet Pro 9015e |
| Scan to computer | HP Smart app > Scan, or printer touchscreen > Scan |
| Copy a document | Place original > Copy > Start Black or Color |
| Check ink levels | Touchscreen home screen (ink tile) or HP Smart app |
| Replace ink | Open front door, wait for carriage, swap cartridges |
| Clean printhead | Settings > Tools > Clean Printhead |
| Factory reset | Settings > Printer Maintenance > Restore > Restore Factory Defaults |
Download the HP OfficeJet Pro 9015e Cheat Sheet
A one‑page PDF with Wi‑Fi setup steps, error code fixes, ink replacement tips, and button shortcuts. Print it and keep it near the printer—it’s ready when the touchscreen shows an error and you need a quick solution.
“HP OfficeJet Pro 9015e Quick Guide (PDF)”
Official HP Support and Manuals
For warranty, drivers, and the official PDF manual, visit:
https://support.hp.com
A Final Note Before You Print
This companion was written to help your OfficeJet Pro 9015e serve you reliably through every report, boarding pass, and photo. May your Wi‑Fi stay solid, your ink always last one more page, and your paper jams be few and far between. If a colleague ever sets up the same printer and stares at the blinking lights, share this guide—it’ll save them a frustrating morning and maybe a cartridge that wasn’t actually empty.
Copyright Warning!
Copyright 2026 productsmanuals.com All rights reserved. This HP OfficeJet Pro 9015e manual is original content and may not be copied, republished, or redistributed without written permission. HP, OfficeJet, and the HP logo are trademarks of HP Inc. This guide is unofficial and not affiliated with HP.