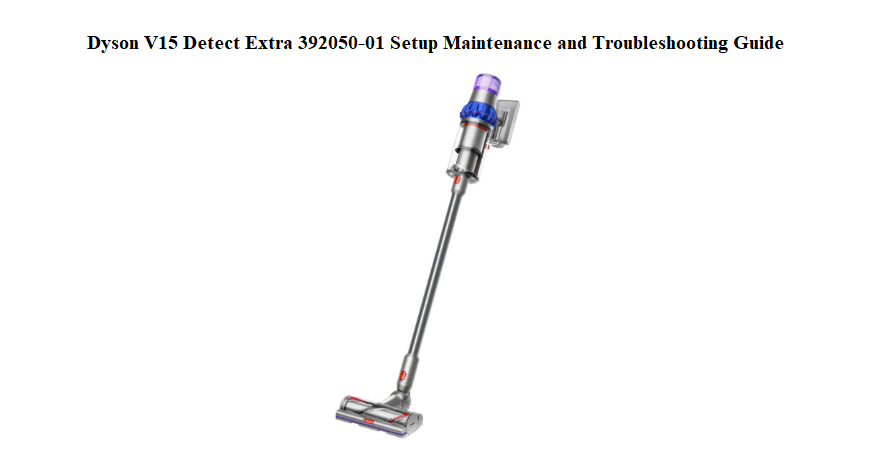
Dyson V15 Detect Extra 392050‑01 Setup Maintenance and Troubleshooting Guide
Why This Manual Exists
Dyson ships the V15 Detect Extra (model 392050‑01) with a Quick Start card, a warranty leaflet, and a link to an online PDF that feels more like a parts catalogue than a user guide. There’s no printed booklet that tells you what the particle counter display actually means, how the piezo sensor decides to boost suction, which floorhead to use on your new hardwood, or why the machine suddenly starts pulsing. Every day, people search for a “Dyson V15 Detect Extra 392050‑01 manual” because they want clear, human‑friendly answers—not a wiring diagram.
This companion is the missing instruction book for your cordless stick vacuum. I’ve run this exact model on carpets, hard floors, pet hair, and inside the car. I’ve washed the filter dozens of times, cleared blockages, and memorized what every light and beep means. Whether you’re assembling the vacuum for the first time, trying to understand a flashing icon, or simply looking for a way to keep the battery healthy for years, you’ll find the answer here. Bookmark this page—the next time the brush bar stops spinning, the display shows a red warning, or the bin won’t empty cleanly, the fix is right here.
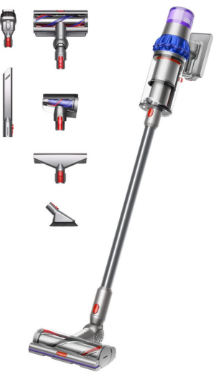
What’s in the Box (392050‑01 Bundle)
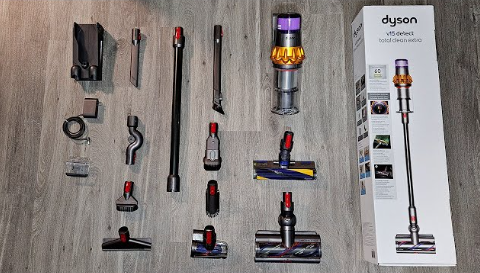
Your specific bundle, model 392050‑01, includes:
- Main body with integrated bin and cyclone
- Metal wand (the long silver tube)
- High Torque cleaner head (with anti‑tangle comb and adjustable suction gate)
- Fluffy Optic cleaner head (with the green laser that shows microscopic dust)
- Hair screw tool (conical brush for pet hair and upholstery)
- Combination tool (brush and wide nozzle in one)
- Crevice tool (long, narrow nozzle for corners)
- Wand storage clip (attaches to the wand to hold tools)
- Wall charger and cable
- Quick Start Guide and warranty information
Everything snaps together with a satisfying click. No screws or tools are needed for assembly.
Putting the Vacuum Together
Assembly takes under a minute.
- Attach the wand: Align the wand’s connector with the main body’s outlet and push firmly until it clicks. To remove, press the red release button on the connection and pull apart.
- Attach a cleaner head: Slide the High Torque head (for carpets and rugs) or the Fluffy Optic head (for hard floors) onto the bottom of the wand until it clicks.
- Handheld mode: Any accessory—the hair screw tool, combination tool, or crevice tool—can be clicked directly onto the main body without the wand. This is ideal for stairs, upholstery, and car interiors.
- Charge fully before first use: Plug the charger into the charging port on the battery. The three blue LEDs on the battery will pulse while charging and turn solid when full. A full charge takes approximately 4.5 hours.
What the LCD Screen Tells You
The small display on the back of the main body is a real‑time command center.
Particle count graph
As you vacuum, a bar rises and falls. It shows the sizes and quantities of particles being sucked up—from 10 microns (dust mites, allergens) to 500 microns (sugar, fleas). This isn’t just a fun fact: in Auto mode, the piezo sensor uses this data to increase suction automatically when you pass over a dusty area and reduce it when the floor is clean, saving battery.
Suction modes
Press the silver button on the back to cycle between three modes:
- Eco: Longest runtime, for light dust on hard floors.
- Auto/Med: The default. The vacuum adjusts suction based on the dust it detects.
- Boost: Maximum suction for stubborn, embedded dirt. Drains the battery fastest.
The selected mode appears on the display, along with an estimate of remaining minutes.
Maintenance alerts
The screen shows a filter icon when it’s time to wash the filter, and a blockage icon if an airway is obstructed. The manual explains how to respond to each in the troubleshooting section.
Choosing the Right Cleaner Head and Using the Green Laser
High Torque cleaner head
This is your all‑rounder. The internal brush bar combines stiff nylon bristles for carpets and soft carbon filaments for hard floors. The anti‑tangle comb automatically clears wrapped hair. You can adjust the suction gate with the red slider on the head: open for carpets (easier push), closed for hard floors (maximum suction force).
Fluffy Optic cleaner head
Designed exclusively for hard surfaces—tile, laminate, hardwood, vinyl. The soft, fluffy roller traps fine dust and polishes the floor. The green laser, turned on by a button on the head, shines across the floor at a low angle, making even invisible dust show up clearly. This is the head to use when you want to be certain your floors are truly clean.
Hair screw tool
The conical brush spirals pet hair and long human hair directly into the bin without tangling. Perfect for sofas, pet beds, car seats, and stairs. Use it directly on the main body.
Combination tool and crevice tool
The combination tool is a brush that slides forward for dusting and back for upholstery. The crevice tool reaches into gaps and corners. Both click onto the wand or directly onto the main body.
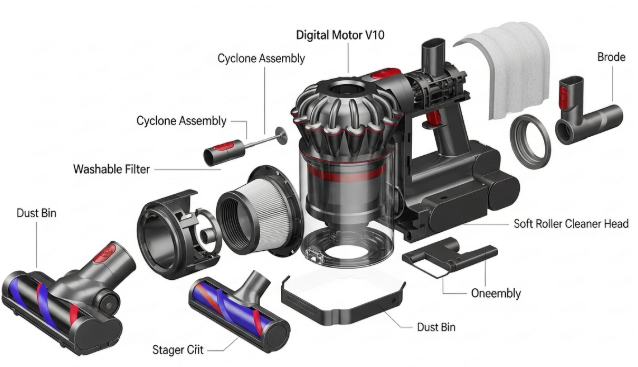
Emptying the Bin the Right Way
The bin holds 0.76 liters. Empty it when debris reaches the MAX line, or if you notice suction dropping.
- Detach the wand or accessory so only the main body is in your hand. Point the bin over a trash can.
- Push the red release lever down firmly. The bin base drops open, and the cyclone assembly slides down, scraping the inside walls clean.
- Push the bin base back up until it clicks securely.
If fine dust clings to the shroud
After several uses, a small amount of fine dust may stick to the metal mesh inside the bin. To clean it, remove the bin entirely by pressing the red button behind the cyclone, then wash the bin with warm water only (no detergents). Let it dry fully for 24 hours before reattaching.
Washing the Filters (Monthly Routine)
The 392050‑01 has two filters that need regular rinsing: the purple pre‑motor filter on the back and the post‑motor filter under the rear cap.
Steps for both filters
- Ensure the vacuum is off and unplugged from the charger.
- Twist the purple filter cap counter‑clockwise and pull it off. Remove the rear cap filter by pulling the tab.
- Tap both against a hard surface to dislodge loose dust.
- Rinse under cold running water. Do not use soap, detergent, or a dishwasher. Gently squeeze the purple filter until the water runs clear.
- Shake out excess water and let both filters dry for at least 24 hours in a warm, airy spot. Never reinstall damp filters—they can damage the motor.
- Once dry, twist the purple filter back on clockwise until it clicks. Press the rear cap filter back into place.
The LCD will show a filter reminder when washing is due. If you wash and dry the filters properly, they should last the lifetime of the vacuum.
Battery and Charging Advice
Charging
Plug the charger directly into the port on the battery. You can also use a wall‑mounted dock (sold separately). The blue LEDs pulse while charging and turn solid when full. If one LED flashes red, the battery is too hot or too cold; allow it to return to room temperature.
Estimated runtime (fully charged)
- Eco mode: up to 60 minutes
- Auto/Med mode: up to 40 minutes
- Boost mode: up to 10 minutes
Using a motorized head (High Torque or Fluffy Optic) reduces runtime compared to non‑motorized tools.
Battery care
- The battery is designed to retain at least 80% capacity after 500 full charge cycles.
- If you notice significantly reduced runtime, you can buy a genuine Dyson replacement battery and swap it yourself by pressing the red release tab on the bottom of the handle.
- Store the vacuum at room temperature, away from direct sunlight.
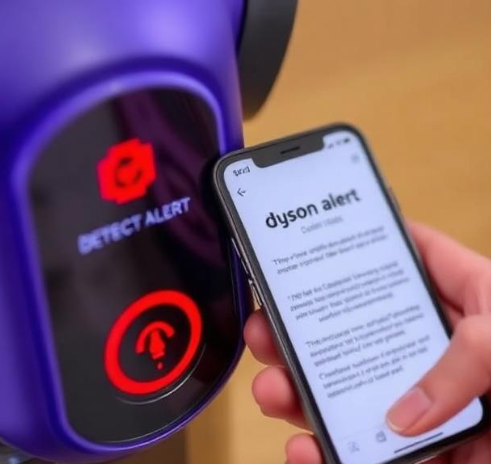
Reading the Lights and Error Icons
| Light / Icon | Meaning | Action |
|---|---|---|
| Blue LEDs pulsing on battery | Charging normally | Wait until solid. |
| One red LED flashing on battery | Temperature fault | Let the battery cool or warm to room temperature. |
| No lights when connected to charger | Fully charged or charger fault | Test charger on another outlet. If all three LEDs are solid, it’s fully charged. |
| Red filter icon on display | Filter needs washing | Wash and dry both filters for 24 hours. |
| Vacuum pulses on and off | Blockage or dirty filter | Check wand, cleaner head, and inlet for blockages. Wash filters. |
| Brush bar not spinning | Jammed brush bar | Remove cleaner head, cut away hair with scissors, reattach. |
| Red warning triangle | General fault | Remove battery, wait 30 seconds, reinsert. If it persists, contact Dyson. |
Troubleshooting Common Issues
Vacuum won’t start
- Check that the battery is charged.
- Remove the battery, wait 30 seconds, then reattach it firmly.
- If it still won’t start, try charging with a different cable or outlet.
Loss of suction
- Empty the bin even if it’s not full; a clogged mesh reduces suction.
- Wash and dry both filters.
- Check for blockages by detaching the wand and cleaner head, and looking through both ends.
Vacuum pulses then cuts out
This is a protective feature. It almost always means a blockage or a dirty filter. Clear any debris from the wand, head, and inlet, then wash the filters.
Short runtime
- If you’re on Boost mode, expect only around 10 minutes—this is normal.
- On Eco mode, if runtime drops below 40 minutes, the battery may be ageing. Consider a replacement.
- Clean filters regularly; clogged filters force the motor to work harder.
Whistling or unusual noise
A high‑pitched sound often signals a partial blockage in the airway. Check the wand, cleaner head, and the inlet behind the bin. Remove any trapped debris.
Resetting and Rebooting the Vacuum
Soft reset
Slide the battery off, wait 30 seconds, and slide it back on. This clears minor electronic glitches.
Hard reset (power cycle)
- Remove the battery.
- Press and hold the trigger (the power button) for 20 seconds to drain any residual charge.
- Reinsert the battery and charge it fully.
No factory reset button
The V15 Detect Extra doesn’t have a dedicated reset button, but the hard reset procedure effectively reboots the internal control systems.
Quick Reference Card
| Action | How |
|---|---|
| Turn on | Pull and hold the trigger; release to stop |
| Change mode | Press the silver button on the back of the main body |
| Empty bin | Push the red release lever down over a trash can |
| Detach wand or tool | Press the red release button on the connection |
| Wash filters | Rinse under cold water, dry 24 hours |
| Clear a jammed brush bar | Remove head, cut hair with scissors, reattach |
| Reset battery | Slide battery off, wait 30 seconds, reattach |
Download the Dyson V15 Detect Extra 392050‑01 Cheat Sheet
A one‑page PDF with cleaning modes, filter maintenance schedule, error light meanings, and button functions. Print it and keep it with your vacuum—it’s there when the display flashes and you need a quick answer.
“Dyson V15 Detect Extra 392050‑01 Quick Guide (PDF)”
Official Dyson Support and Manuals
For warranty, service, and the official digital manual, visit:
https://www.dyson.com/support
A Final Word Before You Store It Away
This companion was written to help your 392050‑01 model run powerfully and quietly, load after load. May the laser reveal all the hidden dust, the piezo sensor always find the dirt you missed, and the battery last long enough to finish the entire house. If a neighbour ever buys the same vacuum and stares at the display in confusion, share this guide—it’ll save them a frustrating afternoon and a call to support.
Copyright Warning!
Copyright 2026 productsmanuals.com All rights reserved. This Dyson V15 Detect Extra 392050‑01 manual is original content and may not be copied, republished, or redistributed without written permission. Dyson, V15 Detect, and the Dyson logo are trademarks of Dyson Ltd. This guide is unofficial and not affiliated with Dyson.