LG LRFXC2606S InstaView Fridge Guide Setup Smart Features and Cooling Solutions
Why This Companion Matters
LG delivers your InstaView Door-in-Door refrigerator with a quick-start pamphlet and a link to a dense online manual. There’s no printed book that plainly explains how the InstaView panel works, what the ThinQ app actually does, how to adjust the convertible drawer, or why the ice maker suddenly stops. Every month, thousands of owners search for an “LG InstaView refrigerator manual” looking for clear, human-friendly help.
This companion answers those everyday questions. I’ve set up the fridge from delivery, connected it to Wi-Fi, cleared ice jams, and explored the settings that most people never touch. Whether you’re plugging it in for the first time or troubleshooting a blinking light at midnight, you’ll find the fix right here. Bookmark this page—the next time the door alarm won’t hush, the Craft Ice maker seems stuck, or a mysterious error code flashes on the display, the answer is ready.
What Arrives with Your Fridge
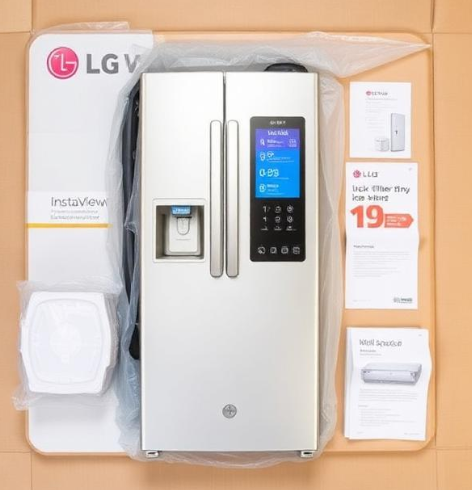
Your delivery includes:
- The refrigerator itself (left and right fridge doors, bottom freezer drawer)
- A water filter (taped inside the fridge)
- Ice maker storage bin (already installed in the freezer or the top left fridge compartment, depending on the model)
- Craft Ice maker unit (if your model includes it, usually in the freezer)
- A quick-start guide and warranty booklet
- Wall spacers and levelling legs
Remove all shipping tape, foam, and plastic film before plugging in. If the fridge was transported horizontally, stand it upright for at least three hours to let the compressor oil settle.
Positioning, Levelling, and Door Alignment
A well-placed fridge runs quieter, uses less energy, and keeps food colder.
Clearance and airflow
Leave at least 5 cm of space behind the fridge, 2.5 cm on each side, and 2.5 cm above. Avoid placing the fridge beside an oven, a radiator, or in direct sunlight. Hot external air forces the compressor to work harder and raises your electricity bill.
Levelling the main body
Find the two front levelling legs beneath the fridge. Use a flat-head screwdriver or a wrench to turn them. Turn clockwise to raise that side, counter-clockwise to lower it. Place a spirit level on top of the fridge, checking both left-to-right and front-to-back. A slight backward tilt (the front about 1 cm higher than the back) helps the doors swing shut on their own and ensures proper defrost drainage.
Door height alignment
If one door appears slightly lower than the other, you can adjust it. Locate the height adjustment nut at the bottom hinge of the lower door. Turn it with a wrench until both doors are flush at the top. This is a small detail that makes the fridge look perfectly installed.
Hooking Up Water and Installing the Filter
The water dispenser and ice makers rely on a steady cold water supply.
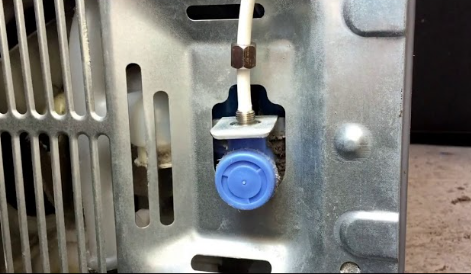
Connecting the water line
Use a ¼‑inch copper or plastic water line. Connect one end to a cold water shut-off valve and the other to the water inlet on the back of the fridge. Tighten the compression nut by hand, then give it a gentle quarter-turn with pliers. Open the valve and check for leaks at both ends.
Installing a new water filter
The filter is usually located inside the left fridge door or in the bottom grille. Insert the new filter and twist it clockwise until it locks. After changing the filter, run about 3 liters of water through the dispenser and discard it. This flushes out air and carbon particles. Reset the filter indicator by pressing and holding the “Filter Reset” or “Water Filter” button on the control panel for 3 seconds.
Checking water pressure
If the dispenser sputters or the ice cubes are small and hollow, your water pressure may be too low (the fridge needs 20–120 psi). A pressure booster pump can help if your household water pressure is consistently low.
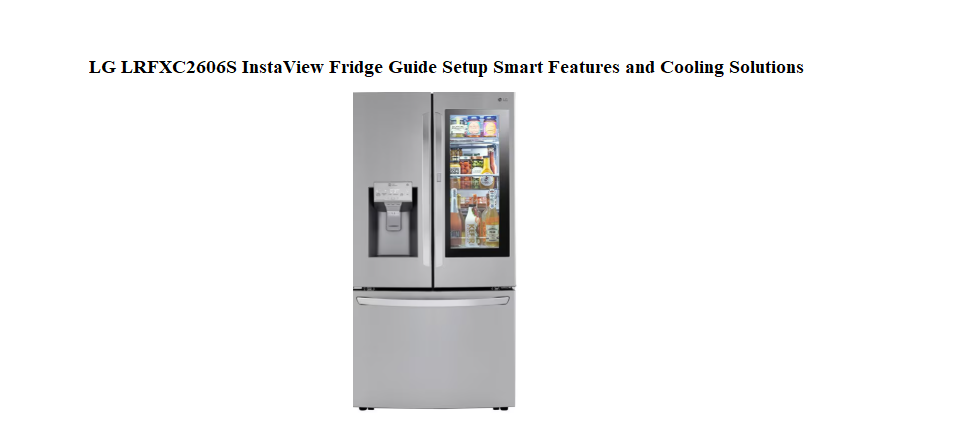
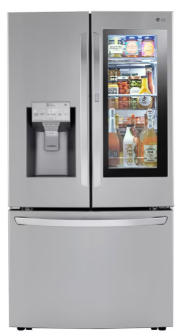
The InstaView Panel and Door-in-Door Explained
The glass panel on the right door lights up when you knock twice. It’s one of the fridge’s signature features, and it works independently of the rest of the electronics.
How to activate InstaView
Knock twice firmly on the glass panel with your knuckles. The interior light illuminates so you can see what’s inside the door-in-door compartment without opening the main door. Knock twice again to turn the light off, or it will time out automatically after a few seconds.
If InstaView stops responding
First, check that the fridge is powered on and not in Demo Mode (see the error codes section). If the panel remains dark, try resetting the fridge by unplugging it for 2 minutes. If the glass is cracked or damaged, do not use the InstaView function and contact LG for service.
Using the door-in-door compartment
The outer door opens independently by pressing the button on the underside of the right door handle. Store snacks, drinks, and frequently used items here. Because you’re not opening the entire fridge, you save cold air and reduce energy consumption.
Control Panel Settings and What Each Button Does
The main control panel is usually located inside the left fridge door or on the door frame, while a secondary panel on the exterior controls the InstaView light and dispenser.
Temperature settings
- Fridge: 3°C (37°F) is the ideal starting point.
- Freezer: -18°C (0°F) keeps food safely frozen.
Press the “Fridge” or “Freezer” buttons repeatedly to adjust. The displayed number is the set temperature, not the current internal reading. Allow 24 hours for the temperature to stabilise after a change.
Express Freeze and Fresh
- Express Freeze: Press this button to rapidly chill the freezer compartment. It runs for about 24 hours, then automatically returns to normal mode. Use it when you’re adding a large amount of fresh food to the freezer.
- Fresh mode: On some models, this optimises the fridge temperature for freshly stored groceries. It runs for a few hours and then reverts.
Wi-Fi and Smart Grid
Press and hold the “Wi-Fi” button (if present) for 3 seconds to put the fridge into pairing mode. Use the LG ThinQ app to connect the fridge to your home network. Once connected, you can monitor temperatures, receive door-open alerts, and diagnose issues from your phone.
Lock button
Press and hold the “Lock” button for 3 seconds to disable all other panel buttons. The lock icon lights up. This prevents accidental changes, especially in a busy kitchen. Hold again to unlock.
Energy Saver
This button toggles the door-frame heaters. In humid environments, turn Energy Saver off to prevent condensation on the door seals. In dry climates, leave it on to reduce electricity use.
The Convertible Drawer and How to Use It
Many LG InstaView models include a convertible drawer beneath the main fridge compartment or inside the freezer.
Temperature presets
Press the “Convertible” button on the control panel to cycle through presets: Meat / Fish (-1°C), Cold Drinks (1°C), Deli / Snacks (3°C), and Freezer (-17°C). Choose based on what you’re storing.
Custom temperature
Some models let you set a specific temperature for the drawer using the “+” and “–” buttons. Wait a few hours for the drawer to reach the new set point after adjusting.
Cleaning the drawer
Slide the drawer out fully, lift it over the stops, and remove it. Wash it with warm, soapy water, rinse, and dry completely before reinserting. The drawer tracks can be wiped with a damp cloth.
Ice Maker and Craft Ice Mastery
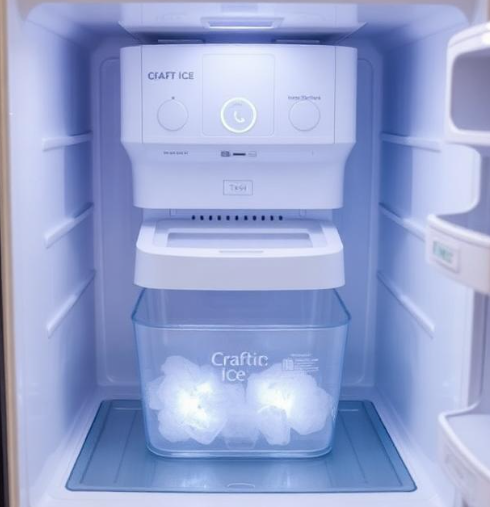
Depending on your model, you may have a standard ice maker in the top-left fridge compartment, a separate ice maker in the freezer, and a Craft Ice maker that produces slow-melting round ice spheres.
Standard ice maker (fridge compartment)
If ice production slows or stops, check that the ice maker arm isn’t stuck in the raised “off” position. Press and hold the ice maker test button (usually on the front of the unit) for 3 seconds to trigger a reset. The ice maker will cycle and begin producing again within a few hours.
Freezer ice maker
This unit typically makes ice faster. If ice clumps form, remove the bin, break up the clumps gently with a wooden spoon, and empty any loose ice that may have melted and refrozen. Avoid using sharp objects that could puncture the bin.
Craft Ice maker
Craft Ice makes three spheres at a time, taking about 24 hours per batch. If the spheres come out cloudy or the maker seems stuck, select “Craft Ice” on the control panel and press and hold the button for 3 seconds to initiate a cleaning cycle. You can also press the test button on the Craft Ice unit (inside the freezer on the left wall) to force a cycle.
Water pressure and ice quality
If ice cubes are small, hollow, or malformed, your water pressure is likely too low. Check that the water line isn’t kinked and the shut-off valve is fully open. Replace the water filter every 6 months to maintain good flow.
Keeping Food Fresher and the Fridge Odour‑Free
Proper food placement
Keep raw meats on the lowest shelf to prevent drips from contaminating other foods. Use the crisper drawers for fruits and vegetables; they maintain slightly higher humidity. Avoid overpacking the shelves—air needs to circulate to keep temperatures even.
Cover everything
Uncovered foods release moisture and odours. Use airtight containers or wrap. Spilled liquids should be wiped up immediately, especially acidic ones like fruit juice, which can stain shelves over time.
Baking soda for freshness
Place an open box of baking soda on a back shelf to absorb lingering odours. Replace it every three months. Do not use scented cleaning products inside the fridge; they can transfer to food.
Clean the door seals
Wipe the rubber gaskets with a mix of warm water and mild dish soap every month. Rinse with a damp cloth and dry. Dirty seals let warm air in, causing the compressor to run longer and frost to build up.
Deep Cleaning Inside and Out
Interior cleaning
Remove all shelves and drawers. Soak them in warm, soapy water, rinse, and dry. Wipe the interior walls with a solution of one tablespoon baking soda to one litre of warm water. Never use abrasive cleaners, bleach, or scouring pads; they scratch the plastic and leave harsh fumes.
Exterior cleaning (stainless steel)
Dampen a micro fiber cloth with water and a mild detergent, then wring it out well. Wipe the doors in the direction of the grain. Dry with a clean microfibre cloth to avoid streaks. For the InstaView glass panel, use a glass cleaner sprayed onto a cloth, not directly onto the glass.
Condenser coils
Every 6 months, pull the fridge away from the wall and vacuum the condenser coils. On LG models, they’re typically accessible behind the bottom front grille. Dusty coils force the compressor to run hotter, wasting electricity and shortening its lifespan.
Drip pan and defrost drain
The drip pan sits above the compressor at the bottom of the fridge. It evaporates defrost water normally. If you notice a musty smell, slide the pan out (it usually pulls straight out), wash it with warm soapy water, and slide it back. The defrost drain hole can sometimes clog. Pour a cup of warm water mixed with a tablespoon of baking soda down the drain to clear it.
Error Codes, Demo Mode, and Resets
| Code | Meaning | What to Do |
|---|---|---|
| OF F or O FF | Demo mode (cooling off) | Press and hold the “Refrigerator” and “Ice Plus” buttons together for 5 seconds until the display stops blinking and the compressor starts. |
| Er IF | Ice maker fan error | Unplug the fridge for 2 minutes. If the error returns, the ice maker fan may be iced over. Defrost the ice maker area gently with warm air (a hairdryer on low) and restart. |
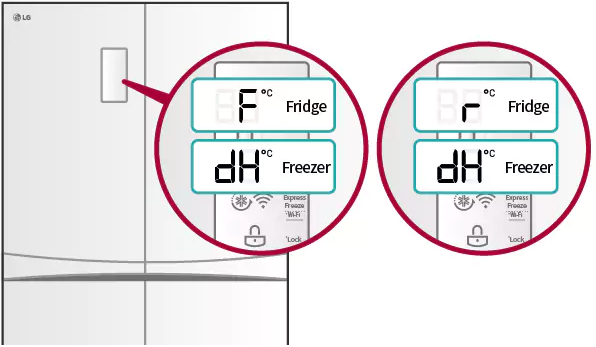
| Er CF | Freezer fan error | Similar to above. Often caused by frost blocking the fan. Unplug and defrost the freezer for a few hours, then restart. |
| Er dH | Defrost heater error | Power cycle the fridge. If the error persists, the defrost heater or sensor may need service. |
| Er CO | Communication error | Power cycle. If it returns, the main control board or wiring harness may need a technician. |
| Er SS | Temperature sensor fault | Unplug and re plug after 2 minutes. If it continues, contact LG service. |
| 88 88 blinking | General power fault | Unplug, wait 5 minutes, plug back in. This usually resets the main control board. |
Hard reset (power cycle)
Unplug the fridge for at least 2 minutes, then plug it back in. This often clears temporary errors and reboots the control board without affecting stored temperatures for a short time.
Factory reset (demo mode exit)
If the fridge displays “OF F” and doesn’t cool, it’s stuck in demo mode (used in stores). Press and hold the “Refrigerator” and “Ice Plus” buttons together for 5 seconds until the display shows the actual temperature. The compressor will start within a minute.
Common Problems You Can Fix Yourself
Fridge is warm, freezer is cold
The evaporator fan in the fridge compartment may be frozen or blocked. Remove items from the back wall, unplug the fridge, and leave the doors open for 24 hours to defrost. If the fan remains silent after defrosting, it may need replacement.
Ice maker produces hollow or small cubes
Low water pressure is the culprit. Check the shut-off valve is fully open and the water line isn’t kinked. Replace the water filter if it’s older than 6 months. If your household water pressure is below 20 psi, install a booster pump.
Water dispenser runs slowly
Replace the water filter first. If still slow, check the water line for kinks. Clean the dispenser nozzle with a soft cloth and warm water; mineral buildup can restrict flow.
Condensation on the door exterior
In humid weather, turn off the Energy Saver mode. This activates the door-frame heaters that prevent sweating. Wipe the seals clean to ensure a tight door closure.
Loud buzzing or humming
A buzzing sound is normal when the compressor runs. If it becomes unusually loud, check that the fridge is level and not touching a wall or cabinet. The drip pan may be vibrating; pull it out, reseat it, and check the rubber mounts.
Quick Reference Card
| Action | How |
|---|---|
| Activate InstaView | Knock twice on the glass panel |
| Toggle door alarm | Press and hold “Alarm” button for 3 seconds |
| Child Lock | Press and hold “Lock” button for 3 seconds |
| Reset water filter indicator | Hold “Filter Reset” button for 3 seconds |
| Force ice maker reset | Press and hold test button on ice maker unit for 3 seconds |
| Enter Wi‑Fi pairing | Press and hold “Wi‑Fi” button for 3 seconds |
| Exit Demo Mode | Press and hold “Refrigerator” and “Ice Plus” for 5 seconds |
| Hard power cycle | Unplug for 2 minutes, plug back in |
Download the LG InstaView Fridge Cheat Sheet
A one‑page PDF with temperature guidelines, error code meanings, cleaning schedule, and button combinations. Print it and stick it on the side of the fridge—it’s ready when the display starts flashing and you need a quick fix.
“LG InstaView Refrigerator Quick Guide (PDF)“
Official LG Support and Manuals
For warranty, service, and the official PDF manual, visit:
https://www.lg.com/us/support/refrigerators
A Short Note Before You Close This Guide
This companion was written to take the mystery out of your LG fridge and help it serve your kitchen quietly and reliably for years. May your ice always be plentiful, your produce stay crisp, and your energy bills remain low. If a friend ever buys a similar model and looks confused at the control panel, share this guide—it’ll make their day a little easier.
Copyright Warning!
Copyright 2026 productsmanuals.com. All rights reserved. This LG InstaView refrigerator manual is original content and may not be copied, republished, or redistributed without written permission. LG, InstaView, ThinQ, and the LG logo are trademarks of LG Electronics. This guide is unofficial and not affiliated with LG.